The success of any website depends upon reaching out to the right audience and visitors. If you are wondering how it is possible, consider providing the content your visitors want.
Adding Google Analytics helps to know who visited your site and what they are doing and looking for, and you can make data-driven decisions, providing them with the most suitable content.
In this blog post, we’ll guide you on how to add Google Analytics to your WordPress site easily.
Table of Contents
What is Google Analytics?
Google Analytics tracks website visitors, showing who visited, what they did, and how they found the site. It’s a powerful tool for understanding user interactions on websites and apps, helping businesses and site owners gain insights into user behavior, track conversions, and enhance the overall user experience.
How does Google Analytics work?
- Data Collection: Using tracking code, Google Analytics gathers data, such as page views, user interactions, session duration, and referral sources, and sends it to Google servers. It can also collect information related to the browser settings, such as the browser used, the device, the language setting, and the operating system. Moreover, it can also track additional information like traffic sources on how they reach your site and the e-commerce transactions if set up correctly.
- Data Processing: After gathering the data, Google Analytics processes it to generate meaningful reports and insights. It involves combining the data, applying filters, and calculating various metrics. Once processed, the data is stored in a database, where data cannot be altered.
- Reporting: Users can view the processed data through the Google Analytics interface. The interface provides a range of reports, dashboards, and data visualization tools to aid in interpreting the information. Users can customize reports and create personalized dashboards. Additionally, Google Analytics integrates with other platforms and tools, including Google Ads, Google Search Console, and third-party applications, to enhance data analysis and marketing efforts.
Why is Google Analytics important?
Google Analytics is essential for several reasons, especially for businesses, website owners, bloggers, and digital marketers. It provides comprehensive insights into website traffic, user behavior, and marketing effectiveness. Tracking key performance indicators, such as page views, bounce rates, and conversion rates, enables data-driven decision-making and optimization of marketing strategies. Additionally, its ability to integrate with other tools, offer real-time data, and provide custom reporting makes it an invaluable resource for improving user experience, measuring campaign success, and driving business growth—all at no cost.
- User Interaction: Google Analytics shows which pages users visit, how long they stay, and what actions they take.
- Traffic Sources: It reveals where visitors come from, like search engines, social media, or referral links, helping you see which marketing works best.
- Audience Segmentation: You can categorize your audience by demographics, interests, location, and device type for targeted marketing and personalized experiences.
- Conversion Tracking: It tracks form submissions, purchases, and sign-ups, helping you measure campaign success.
- Website Performance: Google Analytics provides data on site speed and bounce rates, helping you fix issues to improve user experience.
- Marketing Optimization: Understanding user behavior and traffic sources helps you improve marketing strategies and make better decisions.
How to add Google Analytics to WordPress?
1. Set up Google Analytics account
Sign Up:
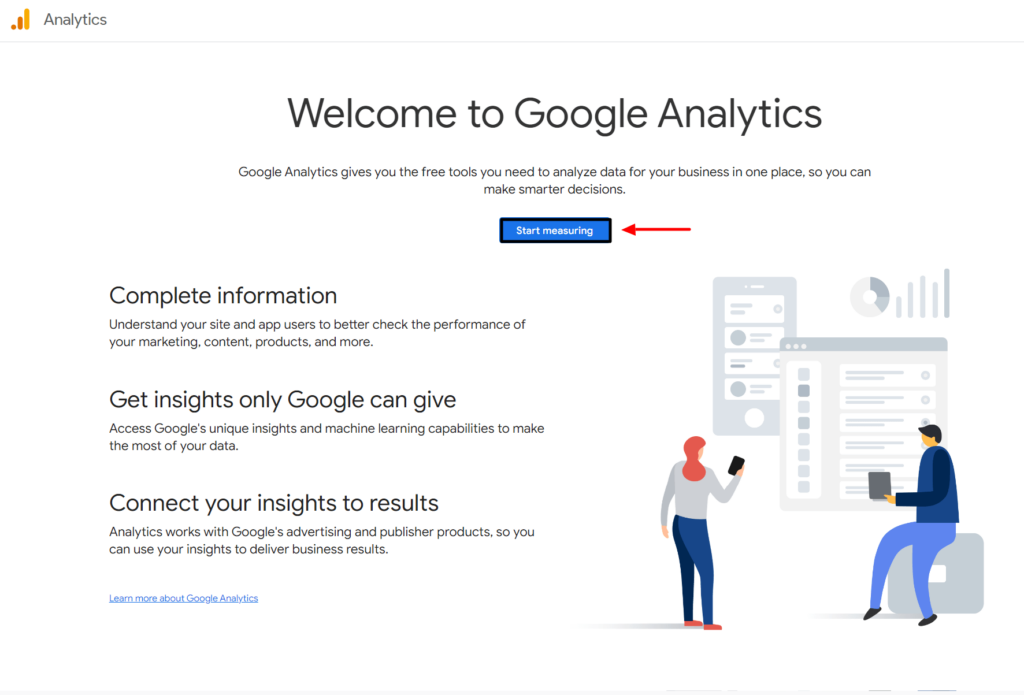
If you do not have a Google Analytics account, go to the Google Analytics website and sign up. After signing in, you will see the Google Analytics homepage. Click on the ‘Start measuring’ button. This will lead you to the steps for configuring your Google Analytics account.
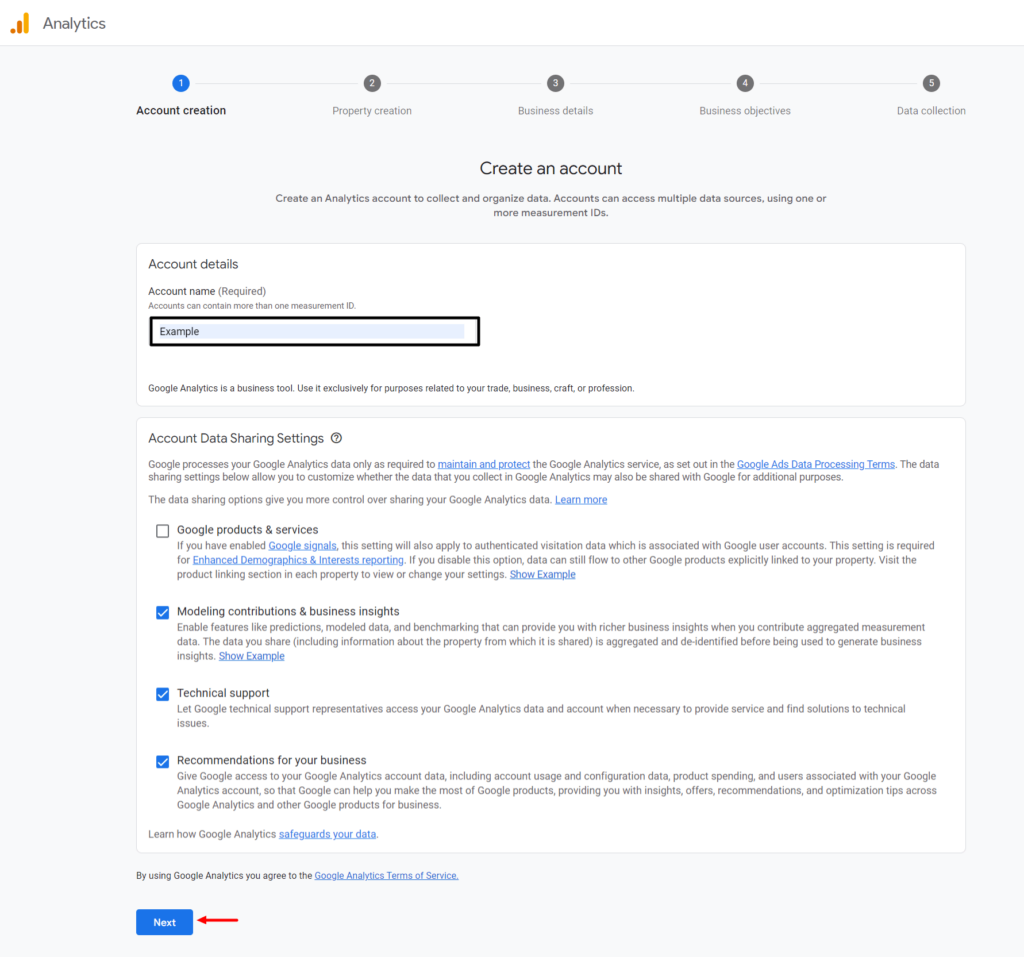
Step 1 – Account creation
In this step, you’ll need to provide an account name and choose different data-sharing options. You can set the account name same as your business name for convenience. Also choose options inside the Account Data Sharing Settings, to share the data that you collect in Google Analytics with Google.
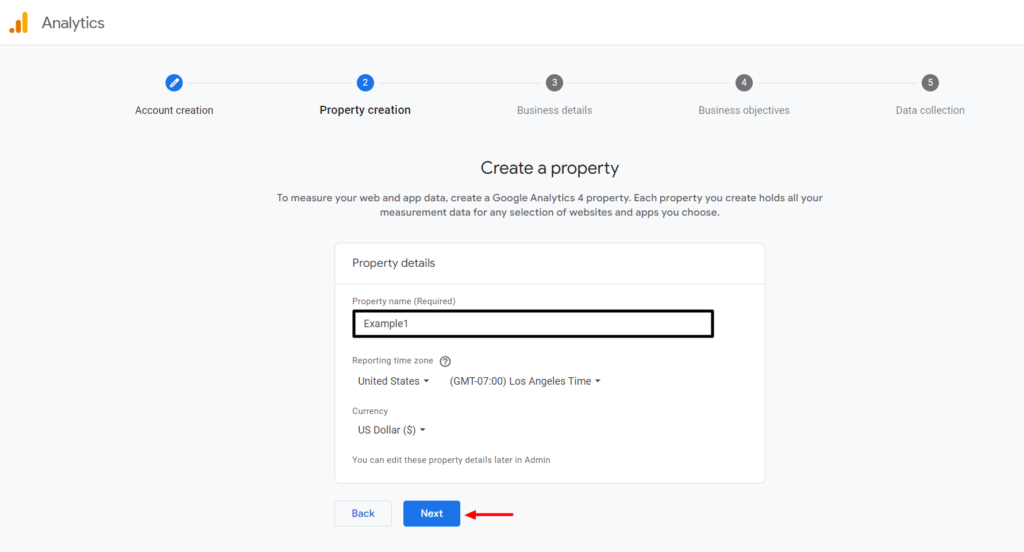
Step 2 – Property Creation
In this step, you will need to create an Analytics Property. Set the property name, select reporting time zone, and currency. Once you are done, click ‘Next’ button.
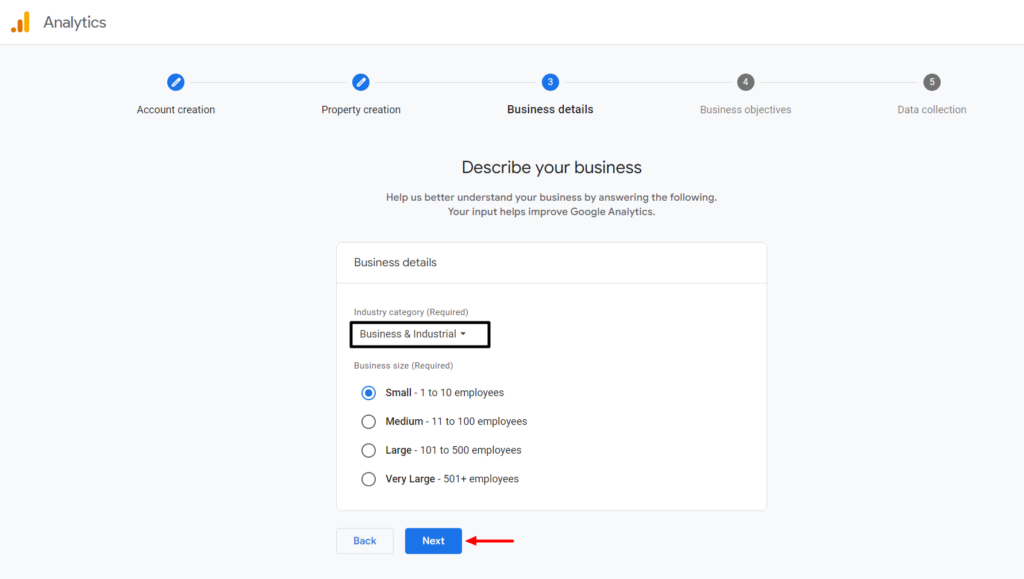
Step 3 – Business details
In this step, select an Industry category of your business, and then select a Business size. Once you are done, click on the ‘Next’ button.
Step 4 – Business Objectives
In this step, choose your business objectives for getting personalized reports of your business from Google Analytics. Select ‘Get baseline reports’ option so that you get all reports of your business from Google Analytics.
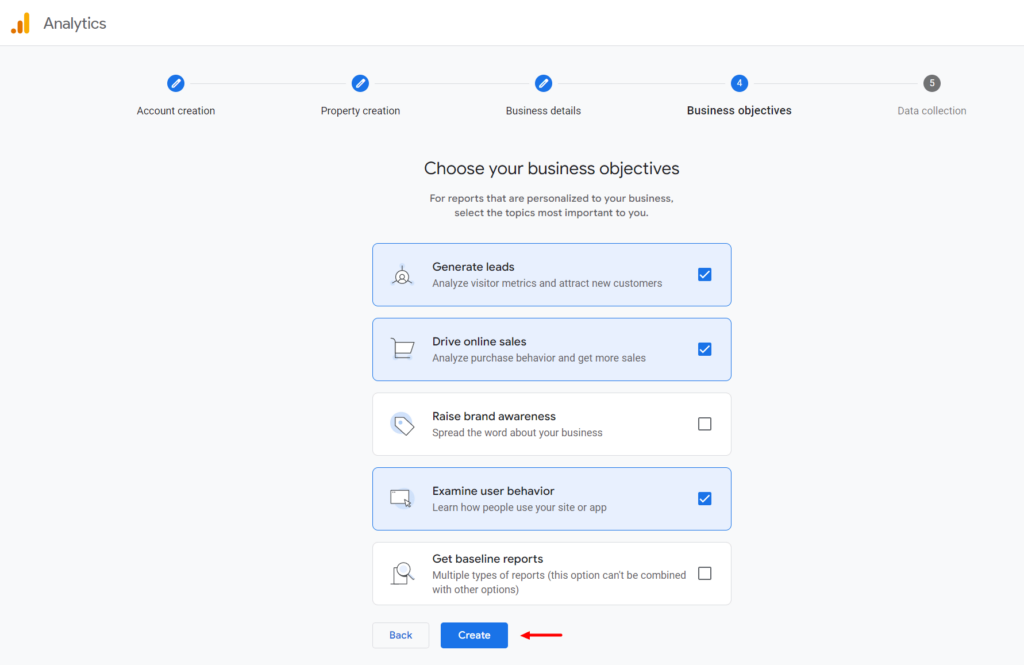
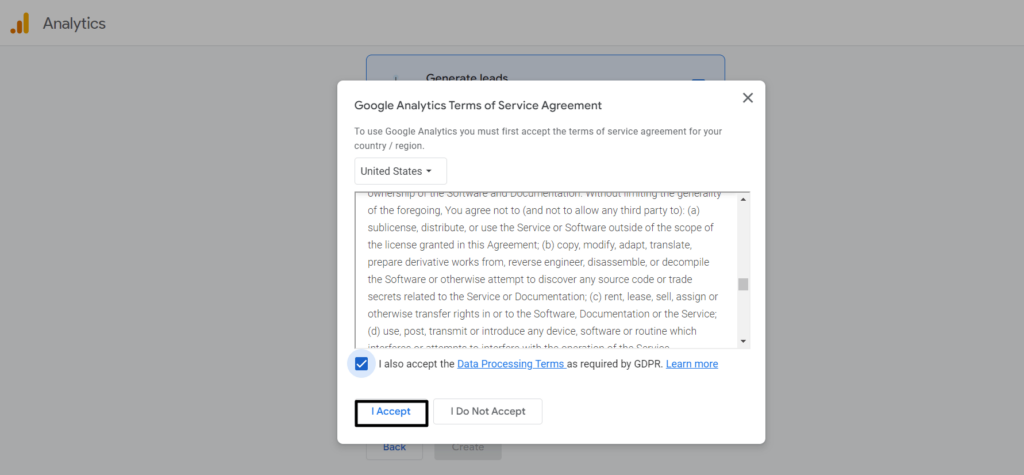
After making your selections, click on the ‘Create’ button. A pop-up message appears with the Google Analytics Terms of Service Agreement. Accept the terms and conditions and click the ‘I Accept’ button.
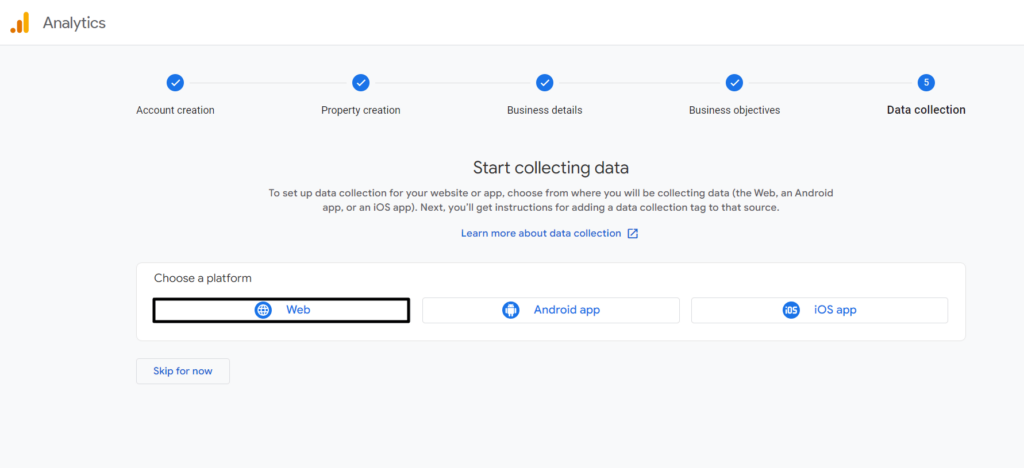
Step 5 – Data Collection
In this step, we’ll choose a platform from which Google Analytics will collect data from. Since we are adding Google Analytics on our WordPress website, we’ll select Web as a platform.
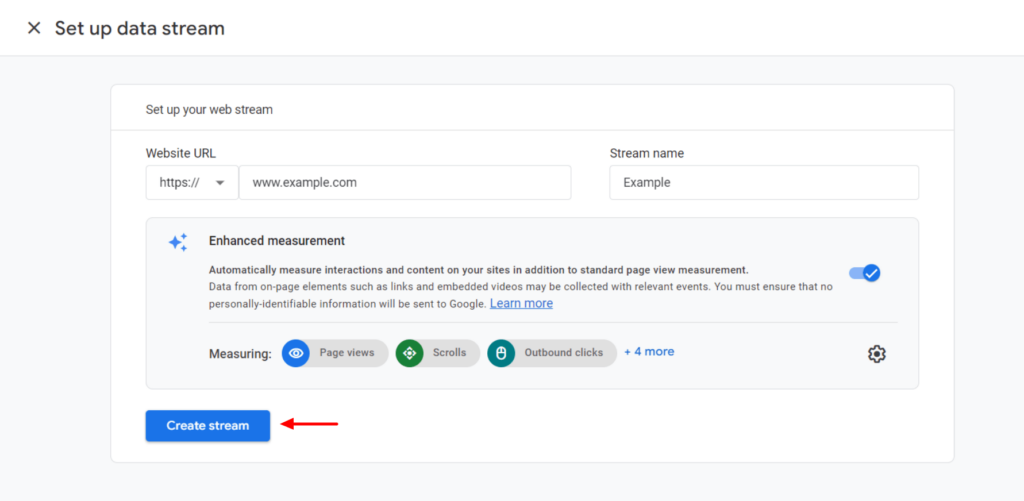
Then, set your website’s URL and a Stream name.
By default, Google Analytics enables the Enhanced Measurement option. This allows Google Analytics to track on-page elements and user interactions on those on-page elements such as Page views, Scrolls, Outbound clicks. etc.
Click on ‘Create stream’ button once you are done.
Now, you will see the Web stream details screen, which indicates the successful creation of the web stream, but data collection is not active and prompts you to use Google Tag Manager.
In Web stream details you can see your Stream details: Stream name, id, URL and Measurement or Tag ID.
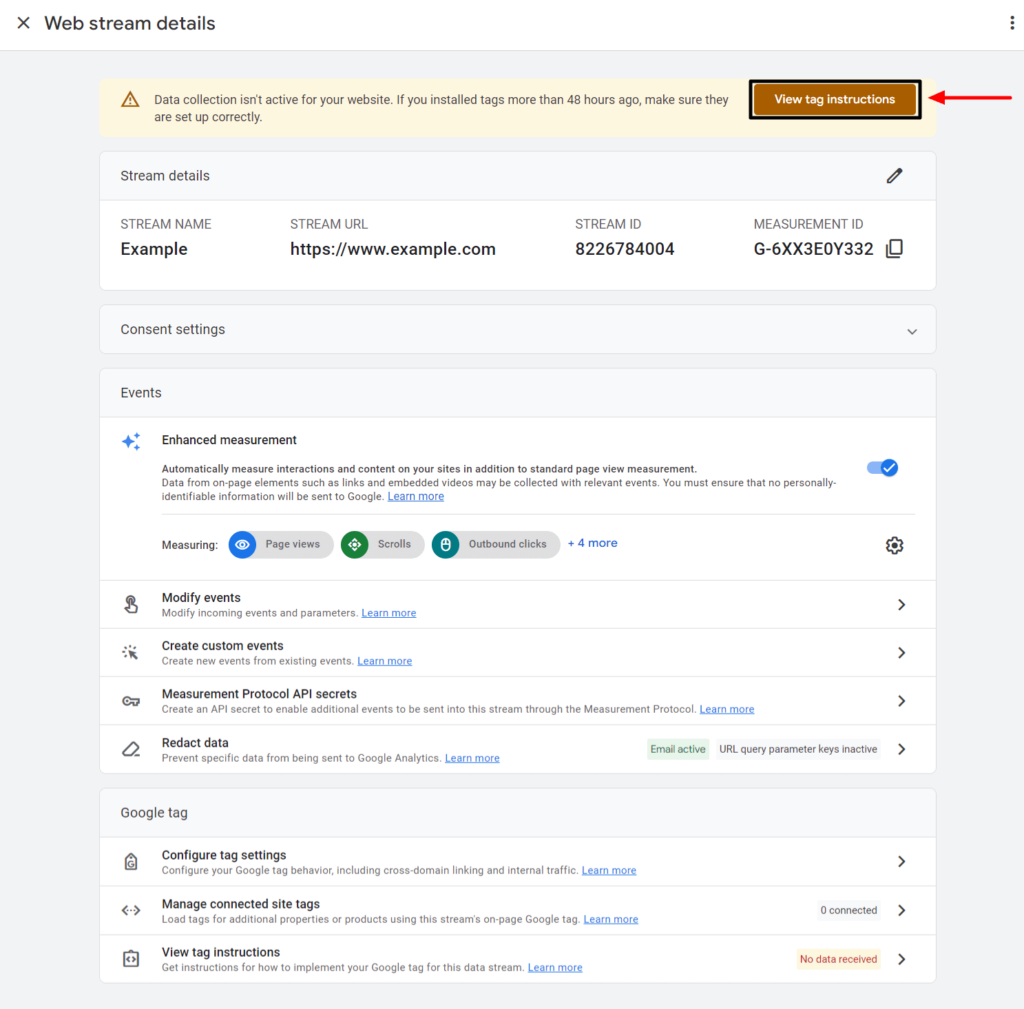
If you click on the View tag instructions button in the alert notice, methods and instructions on how to add Google Analytics to WordPress website will be shown.
We will not be going through Install with a website builder or CMS method and instructions. But you can try this method and follow the instructions to add Google Analytics in your WordPress website.
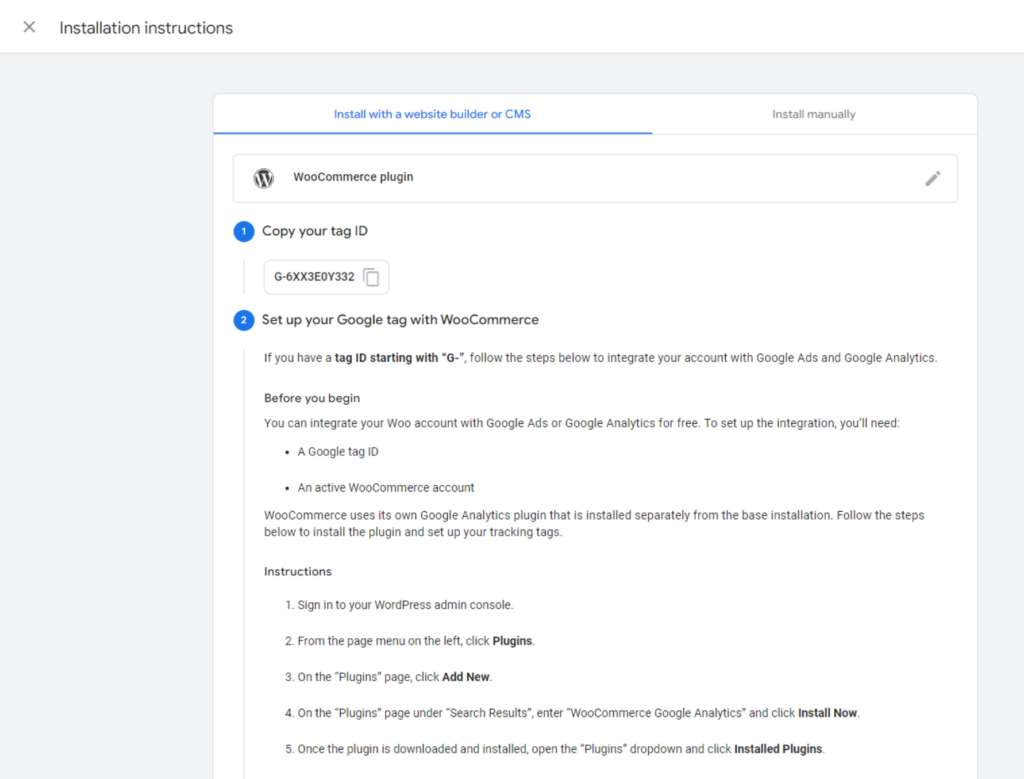
In this turorial, we will be more focused on installing Google Analytics in our WordPress website with ‘Install manually’ method.
When you switch to the Install manually method tab, you will see the Google Analytics tracking code.
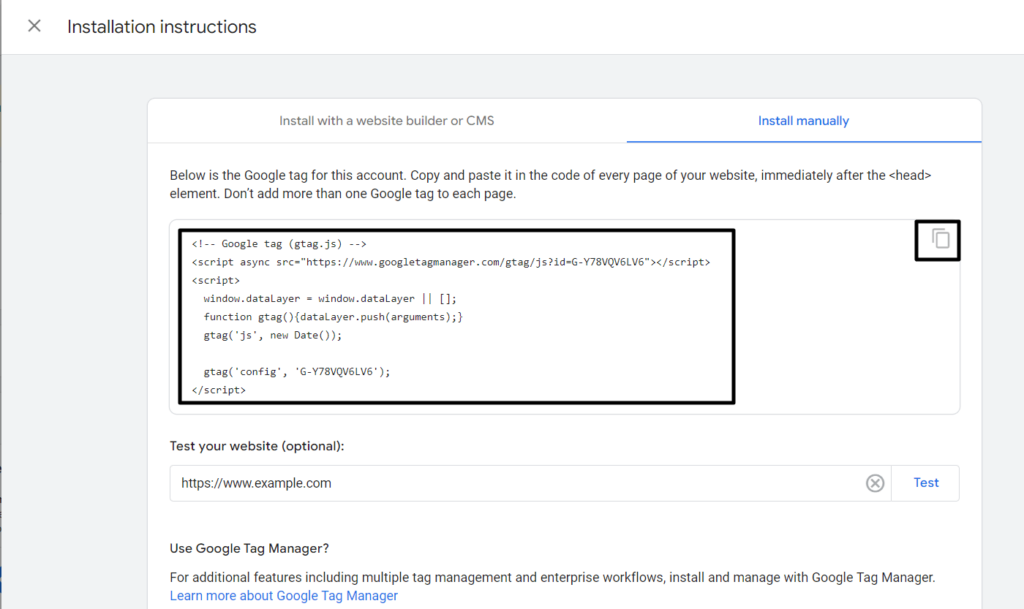
We will copy this Google Analytics tracking code as we will be using this tracking code to add Google Analytics to WordPress website using Method 1 below.
2. Add Google Analytics to WordPress Website
There are several methods to add Google Analytics to WordPress website. We will show you two simple methods below:
Method 1 – Adding code in the theme header.php file
This method is for you if you prefer not to use a plugin. You can manually add the tracking code to your theme header template file.
- Go to your WordPress dashboard.
- Navigate to Appearance > Theme File Editor.
- Locate and click on the header.php file under Theme Files.
- Paste the tracking code from Step – 5, Install manually, before the closing
</head>tag. - Save the changes.
Note: If you are regularly updating your theme, then this method is unsuitable as all the changes to theme template files will be lost once you update the theme.
Method 2 – Using a Plugin
This is the easiest method to add Google Analytics to WordPress website. You can add Google Analytics on your WordPress website using the plugins such as:
- Google Analytics for WordPress
- Site Kit by Google
- Analytify
- GA Google Analytics
- Beehive Analytics
- and many more.
The main benefit of using above listed plugins is that you can see your Google Analytics reports on your WordPress dashboard without the need to visit your Google Analytics account.
Here, we have used MonsterInsights plugin for an example. MonsterInsights is one the popular Google Analytics plugins for WordPress and has over 3 million active WordPress installations.
Add Google Analytics in WordPress using MonsterInsights plugin:
- Go to your WordPress dashboard.
- Navigate to Plugins > Add New.
- Search for “MonsterInsights” and once found, install & activate it.
- Follow the setup wizard to connect your Google Analytics account.
It is this simple and easy.
3. Verify the Installation
Once you have added Google Analytics on your WordPress website using either of the two methods above, go to your Google Analytics account and check data is being receiving from your WordPress website and Google Analytics is providing you the real-time report.
Conclusion
We hope this article has helped you add Google Analytics to your WordPress site. With the methods and instructions provided, we hope you can easily add Google Analytics to WordPress website and start collecting data to optimize your content, enhance user experience, and improve your marketing strategies. Whether you are new to this or an experienced site owner, integrating Google Analytics is essential for reaching your website goals and maximizing its potential.
You might be interested in creating successful email marketing campaigns, check out our article on Effective Email Marketing Strategies.
If you find the article helpful, please share your experiences in the comment section below.
Thank you for reading till the end.
