Today, in this article, I will be writing about how you can add Google AdSense to a WordPress website. Google AdSense has been one of the most popular advertisement program over time. If we take a look at advertisement networks, Google AdSense is not just only an option. There are plenty of alternatives to Google AdSense, for example, MGID, BuySellAds, Infolinks, Media.net, etc.
Nevertheless, Google AdSense has been always a favorite of publishers for many reasons. It is an excellent popular platform that lets you display ads relevant to your website content and earn money when a visitor clicks on the ads.
Publishers love Google AdSense as it has easy integration, security of payment payout, better conversion from ads as Google AdSense shows relevant ads according to website content.
Enough overview, let’s be in the actual topic. At this point, I will assume you already have a Google AdSense account approved & WordPress website with you. As this article is not about getting Google AdSense account approved I won’t be going through the steps to get your Google AdSense account. I will stay at the surface and write on how you can add Google AdSense to the WordPress website.
Add Google AdSense To WordPress Website
If you had gone through Google search, I believe you have found hundreds of search results that demonstrate how you can add Google AdSense to your WordPress website in many ways. But in this article, I will guide you in straight forward easy steps that you can follow & do it yourself.
Assuming you are not a coding expert or a programmer, I will be using a free WordPress plugin called Universal Google AdSense & Ads Manager. It is a free WordPress plugin that can also be downloaded from official WordPress’s plugin repo. When I mention Universal Google AdSense and Ads Manager plugin this is not the only plugin that helps to add Google AdSense to your WordPress website but it has other alternatives too.
But for this article lets stick with the Universal Google AdSense & Ads Manager as it has plenty of features, easy to use & is our very own plugin.
In simple words, Universal Google AdSense and Ads Manager, WordPress plugin, helps to insert Google AdSense ad code to your WordPress website. It requires no programming or coding skills to use this plugin. If you would like to know more you can always read it, here.
Step 1: Install Universal Google AdSense & Ads Manager(UGAAM) Plugin
It can be installed with just a few clicks just the same way you install other WordPress plugins. If you are not sure about the installation process, please follow the instruction below.
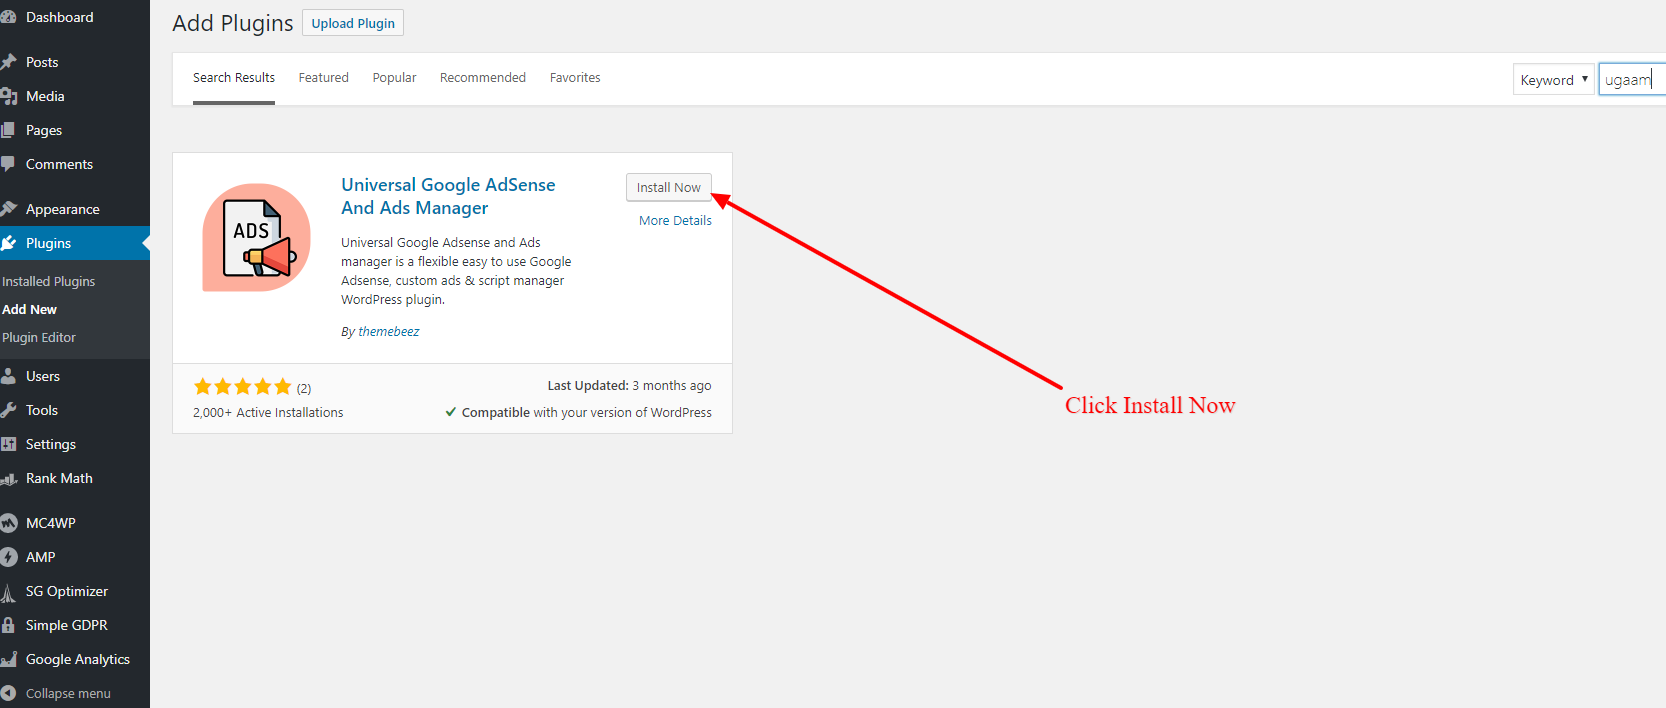
- Go to WordPress dashboard > Plugins/Extension
- Click Add New button
- On search field, type ‘ugaam’.
- Once Universal Google AdSense And Ads Manager appears in the search result, click the Install Now button
- Click on Activate button to activate the plugin
An alternative way to install it is first to download the plugin from, here, then follow the steps below.
- Go to WordPress dashboard > Plugins/Extension
- Click Add New button
- Click on Upload Plugin button & select the downloaded .zip plugin file from your computer and click on Install Now button
- Once the installation is successfully completed, activate the plugin
Step 2: UGAAM About Page At Dashboard
Once the plugin is installed & activated, you will notice a new menu item at your WordPress dashboard. Click at the menu item UGAAM to go on UGAAM’s info page.
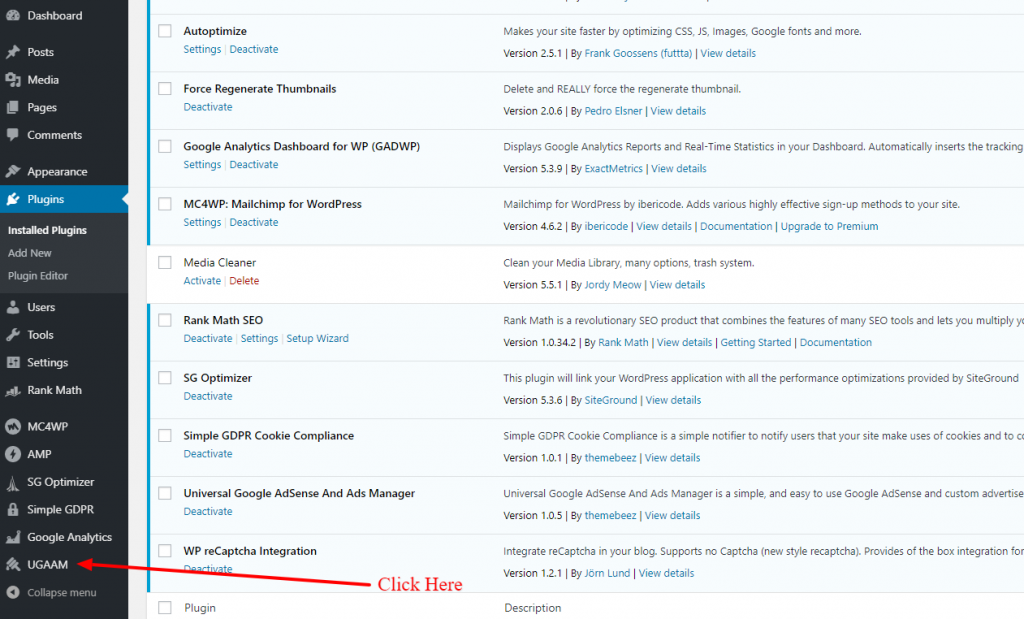
UGAAM’s info page contains a brief introduction of UGAAM itself and some instructions and FAQs.
Step 3: Domain Verification
While you were at the very beginning phase of getting Google AdSense’s account approved I hope you have seen code as below.
<script async src="https://pagead2.googlesyndication.com/pagead/js/adsbygoogle.js"></script>
<script>
   (adsbygoogle = window.adsbygoogle || []).push({
   google_ad_client: "ca-pub-3479356048943928",
   enable_page_level_ads: true
});
</script>
If you’d remembered, you had to paste this code somewhere with-in <head> </head> tag. This is a way to insert Google ad code at the header of a WordPress website. If you do not remember doing this then it is not a big deal.
Simply copy the above script & paste it in your notepad or any word file. Kindly change the publisher ID 3479356048943928 to your own publisher ID.
For example:
<script async src="https://pagead2.googlesyndication.com/pagead/js/adsbygoogle.js"></script>
<script>
   (adsbygoogle = window.adsbygoogle || []).push({
   google_ad_client: "ca-pub-xxxxxxxxxxxxxxx",
   enable_page_level_ads: true
});
</script>
Here xxxxxxxxxxxxxxx is to be replaced by your Google AdSense’s publisher ID. Once you replace the ID, copy the entire script in your clipboard & follow the instructions below.
- Go to Dashboard > Appearances > Customizer
- Navigate to Universal Google AdSense and Ads Manager panel which is usually at the bottom of the customizer
- Go to Header/Footer scripts
- Paste the script that you had copied earlier
- Click Publish button at customizer
Did you notice any difference? We went to WordPress’s customizer to insert the script into our WordPress website. Hence, keep in mind we will go to customizer to add other ad codes too. We have just verified our domain with Google AdSense service in case you had not done it earlier.
Step 4: Auto Ad vs. Manual Ads
This step can be considered as one of the most important in this whole article. Google AdSense has two different approaches to display ads on our website. They are as follows.
- Auto Ads approach
- Manual Ads approach
It is very important to understand both the approach as they are totally different from one another. I will explain to them individually.
Google Auto Ads
I won’t be going through the actual definition & explain here about the auto ads. Instead, I will give you a brief overview of Google auto ads in simple words. Google introduced auto ads later after the manual ad unit was introduced. This is also known as the new feature of Google AdSense. Google claims that auto ads help to increase revenue by 20% than manual ad units.
Auto ads, as the name is, Google automatically detects your content & decides placement where to display advertisement on your website. Google AdSense AI(Artificial Intelligence) has been smarter these days. Google AdSense AI automatically finds the placement where the ad can be placed & it displays the advertisement according to the content nature on your website.
We live in an era of smartphones than humans ?. Smart technologies have assisted us to make our life smarter. But do you think always the technologies are better than humans? I am not sure about you but watch the video below for my answer lol ?
I would partially agree to it but I prefer manual ad unit over auto ads. Yes, I know that you won’t agree. I understand you completely. Here are the reasons as to why I do not prefer Google auto ads.
- Auto ads are better if you do not care where Google places its advertisement.
- Since auto ads automatically decide where to place ads it may break the design of your website. (In some cases)
- Auto ads would work great but have a limitation, Auto ads do not follow a similar pattern. Ads keep rotating & there won’t be ads where actually it’s required.
- There might be a condition like on some sections where you never wish to display ads but auto ads may display ads there too.
Here’s the bottom line of auto ads. Google offers few customizations for auto ads but personally I feel that they won’t be more enough for me to display Google ads like how I want them to be displayed. I am personally not sure what do you think in this particular matter. I simply can suggest you use auto ads if they work great for you.
Implementation of auto ads on your website will be continued on step 5 below. Before doing that let me give you a complete overview of the manual ad unit.
Google Manual Ad Unit
Simply an old school method for displaying ads on your website which works great for me lol ?. While using the manual ad unit approach we do have full control where to display ads our websites. I will be going through a simple break down of a webpage in order to understand how a web page looks like. This also could be a difficult approach to display advertisements over auto ads if you do not understand the section of your website.
Below is the figure of a basic web page. The header section is where usually logo or branding goes. At the main content section area, we usually have text, image & posts. On the sidebar, we usually have stuff like search, banner ads, widgets, etc. Whereas at footer we prefer to have our copyright text & widgets just above it.
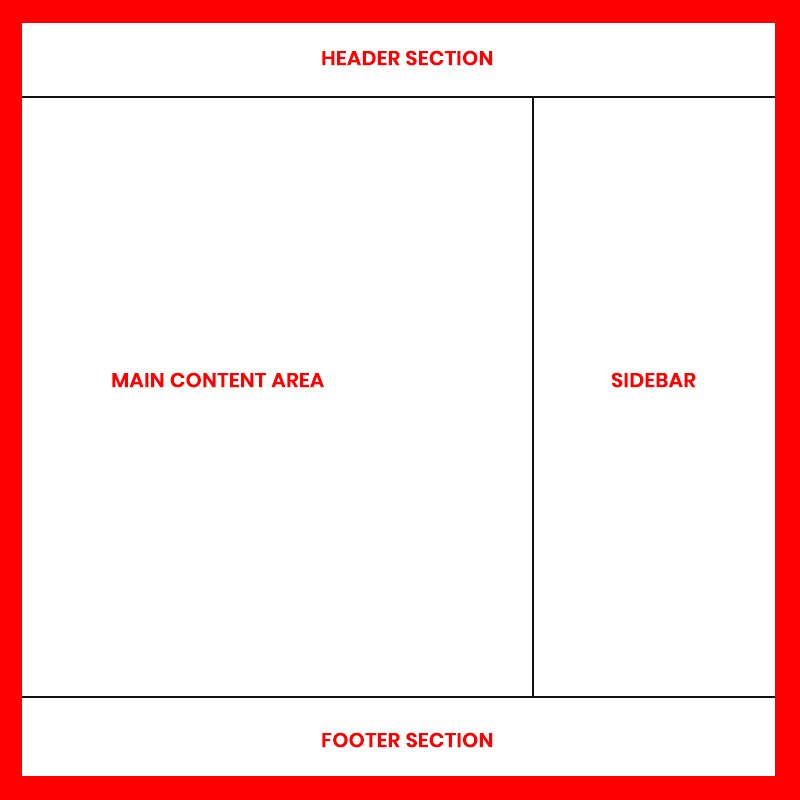
If you can understand this basic webpage structure than you can follow step 6 to add Google AdSense to WordPress website with the manual ad unit approach or you should go with the auto ads approach in step 5.
Step 5: Adding Auto Ad Code to WordPress
Adding Google AdSense auto ad code is very simple with Universal Google AdSense and Ads Manager plugin. All you need to do is to grab auto ad code from Adsense dashboard & paste that ad code at footer script at Universal Google AdSense customizer panel. Let me guide you step by step below.
- Go to Google AdSense dashboard and click at the overview
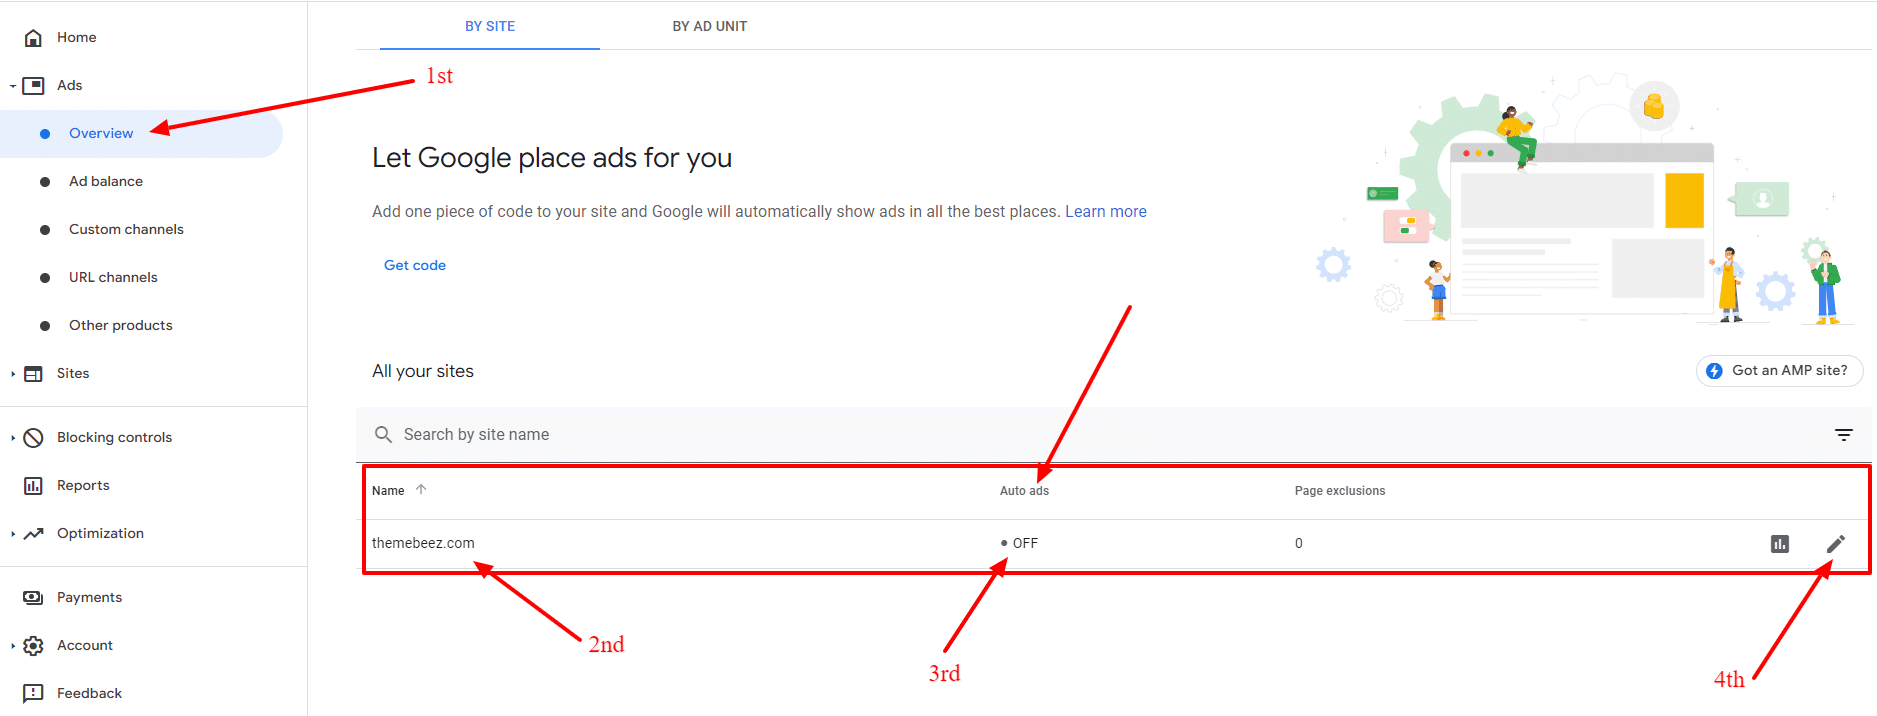
Once you click at pencil edit icon at the bottom right you will reach to the page where you can modify settings & get ad code which is supposed to be added with-in <head>...</head>. The auto ad code that you will receive from Google AdSense will some like below.
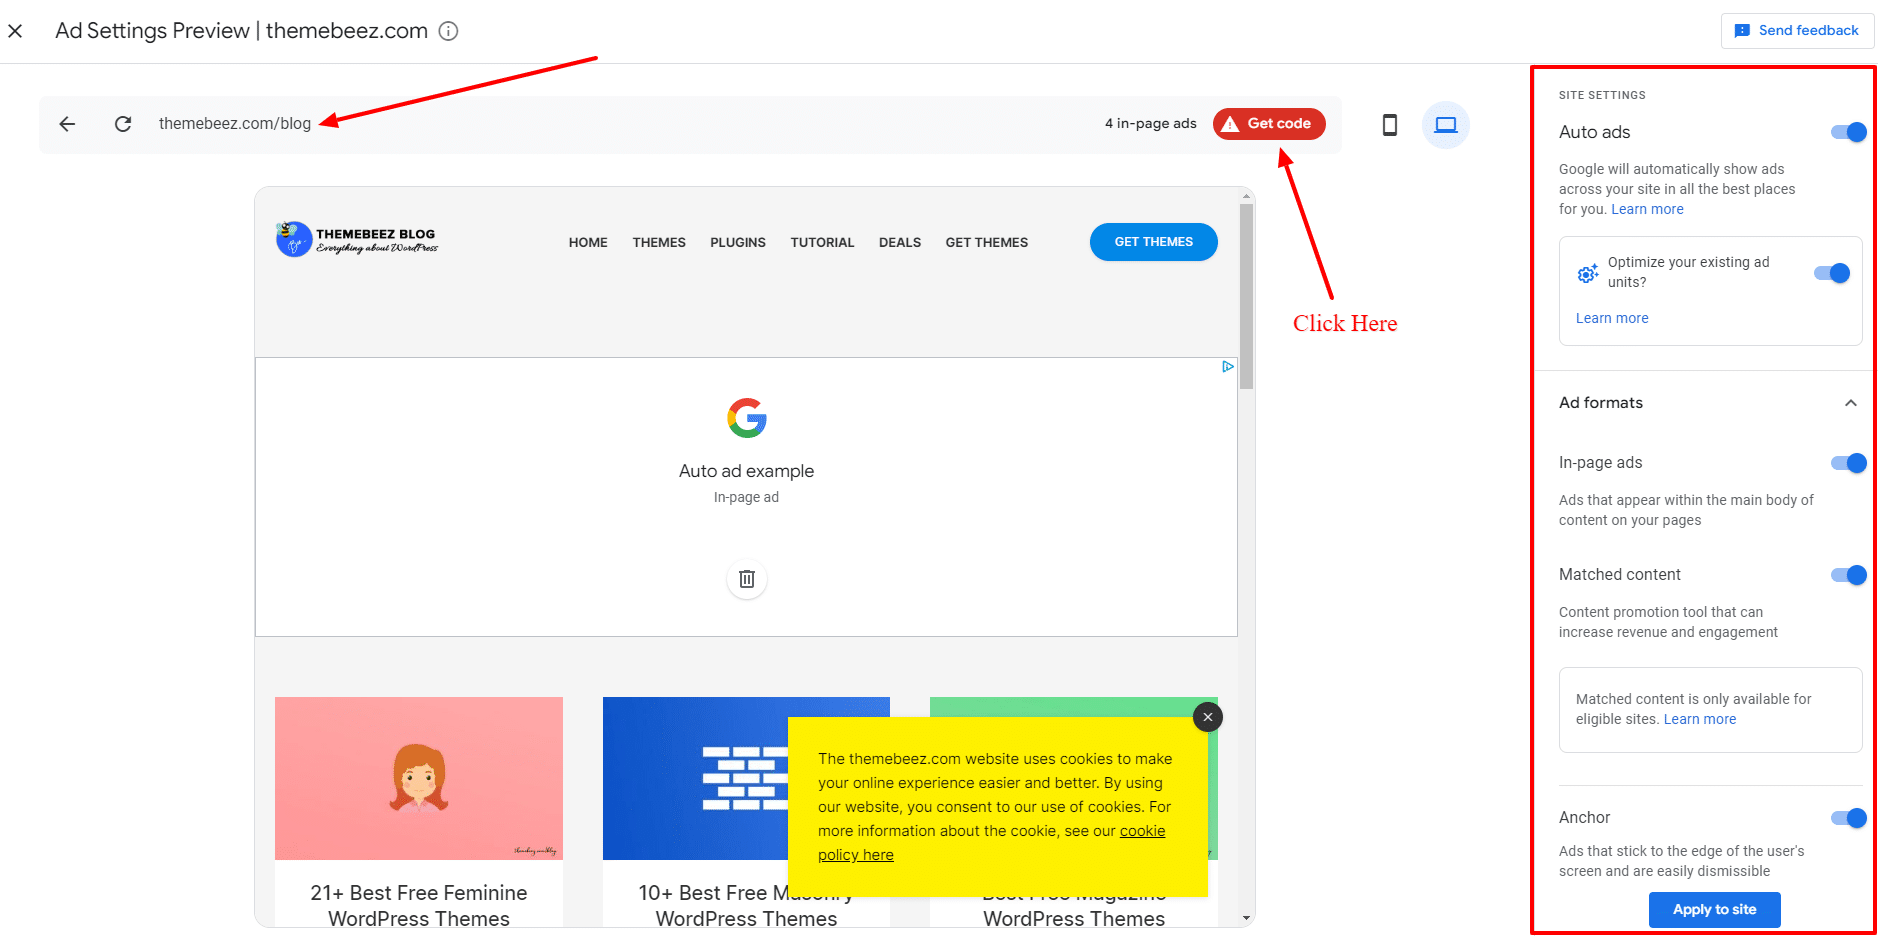
There are few other options on the right side which you can enable or disable depending on how you wish to display Google auto ads. Once you are done with those options you can simply click on the button, Get code, which is on the top.
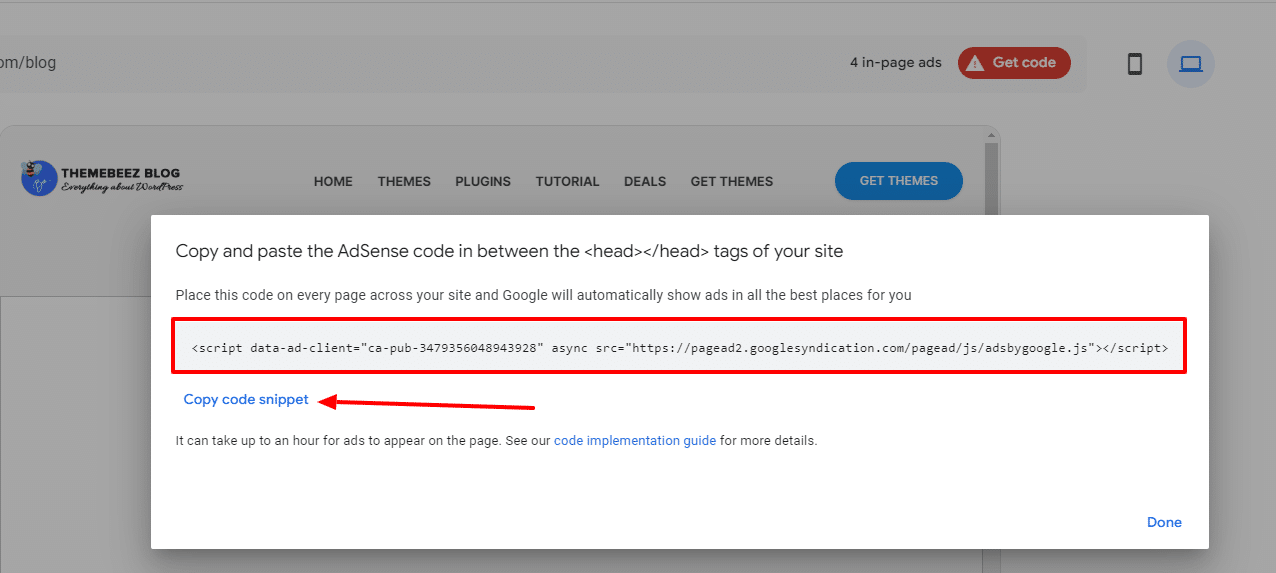
The code that you get from Google auto ad should look like as below.
<script data-ad-client="ca-pub-3479356048943928" async src="https://pagead2.googlesyndication.com/pagead/js/adsbygoogle.js"></script>Note: The only difference will be the publisher ID in your case.
- Now, go to Dashboard > Appearances > Customizer > Universal Google AdSense and Ads Manager > Header/Footer script
- Paste the Google auto ad code at header script
- Now click the Publish button at customizer
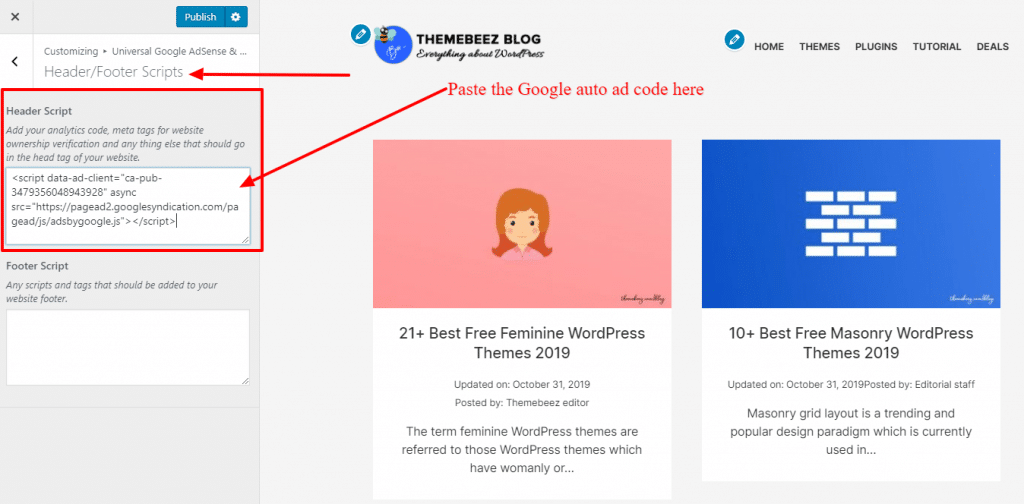
Once you’ve clicked on the Publish button at customizer, it might take a few minutes and then Google will start to display auto ads at your website. Like I mentioned earlier Google will automatically add Google AdSense advertisements on your WordPress website.
Coming to the conclusion of Google auto ads, here you have successfully added Google auto ads on your WordPress website. But if you wish to implement a manual ad unit then do kindly read Step 6.
Step 6: Adding Manual Ad Unit Code to WordPress
Adding manual ad unit code to WordPress will be a bit difficult when compared to the inserting auto ad code. Here, in this approach, things might get a little tricky depending upon how your website is built. As the Google Adsense manual ad unit does not display advertisements automatically in a different part of our website we are supposed to add Google AdSense to WordPress manually.
If you remember the figure of a simple webpage layout above you will be more likely to understand how you can add Google AdSense to WordPress manually in different sections of your website. Now, I will break down the WordPress website into different sections & share an idea with you to understand the sections of your website.
- Header: Section where mostly logo & branding goes. Some WordPress themes do have an advertisement space at header too. This may vary according to the layout of a WordPress theme that you are using.
- Footer: Section where we mostly write copyright text. Most WordPress themes do offer widget area(s) at the footer.
- Sidebar: I am sure you know about this very well. The sidebar is an aside section at your website which is next to the main content area.
- Main content area: In a simple explanation, the main area where blog posts, articles, texts & images are displayed. Depending upon a WordPress theme that you are using, some themes do have widget area(s) at the main content area too. Since WordPress themes may have different page templates so the main content area may vary from one another.
Hope you got familiar with the term widget area. The widget area is a section on our website where we can add widgets. The number of widget area(s) is different in all the WordPress themes. In general most of the WordPress themes do have sidebar & footer widget areas.
How Can You Check Widget Areas In Your WordPress Theme?
To access the widget area(s) in all WordPress websites navigate to Dashboard > Appearances > Widgets.
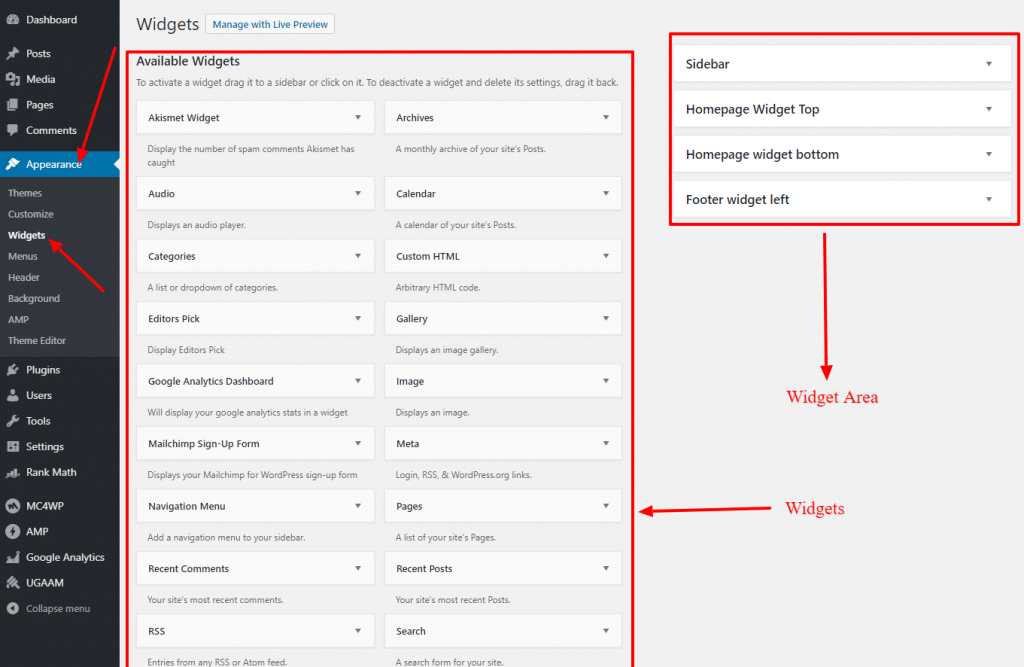
Again, the number of widget areas, widgets & name of widget areas might be different in your case. Now we will be generating a Google AdSense advertisement code & paste those ads code that we get from Google AdSense dashboard manually at the different widget areas of our website.
Get Google AdSense Advertisement Code
It is very easy to get a Google AdSense advertisement code from the Google Adsense dashboard. The video below which will guide you to generate Google AdSense advertisement code.
Note: Square & Skyscrapper size advertisement is the best fit for sidebar & footer widget areas.
I hope you already have a Google AdSense ad code with you now. In the above way, you can create different types of advertisement codes in various sizes & name them accordingly to use them later at different parts of your website.
How To Add Google AdSense Advertisement Code At Widget Areas?
If you are not at widgets page then navigate to Dashboard > Appearances > Widgets. Look for Custom HTML or UGAAM: Ads and Scripts widget.
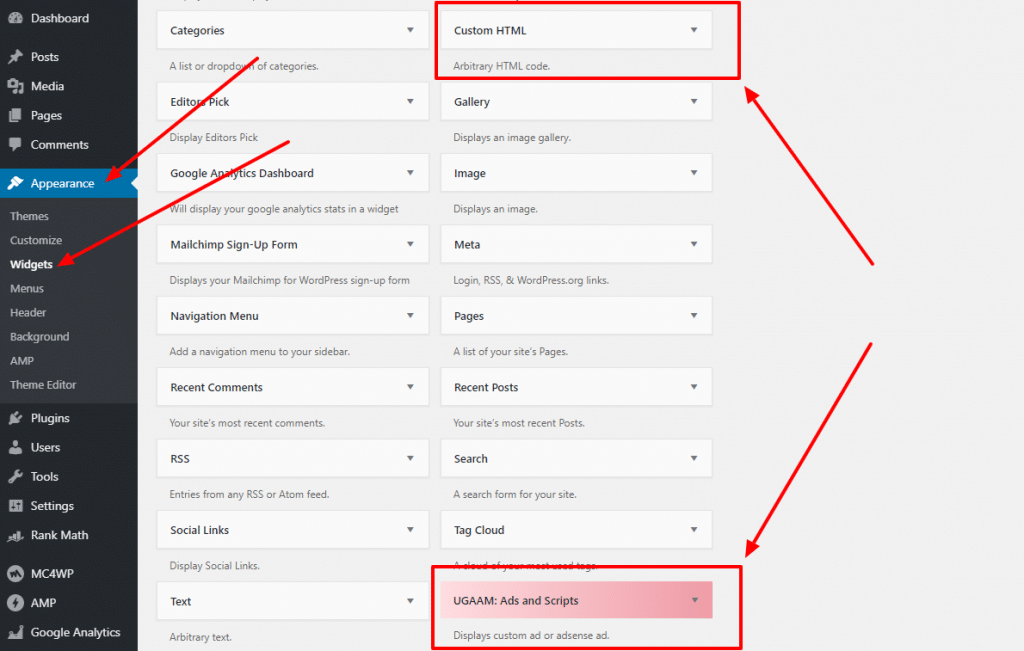
Now click & drag either Custom HTML or UGAAM: Ads and Scripts widget to any of the widget areas. Once it is done, simply paste the Google Adsense code that you had generated on it. Click the Save button.
Now it’s time to navigate to the front-end of your website & reload it. In some cases, if you recently got your Google AdSense approved you may notice yellow boxes instead of actual Google Ads. It might take some minutes – hours to actually display advertisements on those boxes.
In this way, you can add Google AdSense advertisement codes to different widgets areas. Make sure to use horizontal ad code for main content areas and header widget areas.
What Are WordPress Templates? (Homepage & Inner Pages)
You all know that most of the websites do have inner pages beside of home-page. WordPress comes with six different pages. In a technical word, we call them templates. The template is a collection of different pages & layouts. Below is the list of templates that are available in a default WordPress themes.
- Index/frontpage template: The main Home page of your website/blog.
- Archive page template: Page that holds a collection of posts. There are different types of an archive in WordPress for an example: Category archive, Tags archive, Date archive, Author archive, etc.
- Search page template: Page that displays search results.
- 404 Page template: Page that is displayed when invalid URL is clicked
- Default page template: Individual pages like Contact Us, About Us, Privacy Policy, etc.
- Blog single or blog detail page template: Blog detail page where we usually write a long story ?.
If you wish to explore more detail about WordPress templates then you can visit the official WordPress codex guide.
Insert Google AdSense Code In Inner Pages Of WordPress
At this point, I will assume that you have understood the different WordPress templates & inner pages. Again, Universal Google AdSense and Ads Manager(UGAAM) plugin will help you here. UGAAM has options in the customizer that can be used to insert Google AdSense code in different inner pages of your WordPress website. Not only that Ugaam also has a shortcode feature that will also help you to insert Google AdSense code at the desired location of your web page.
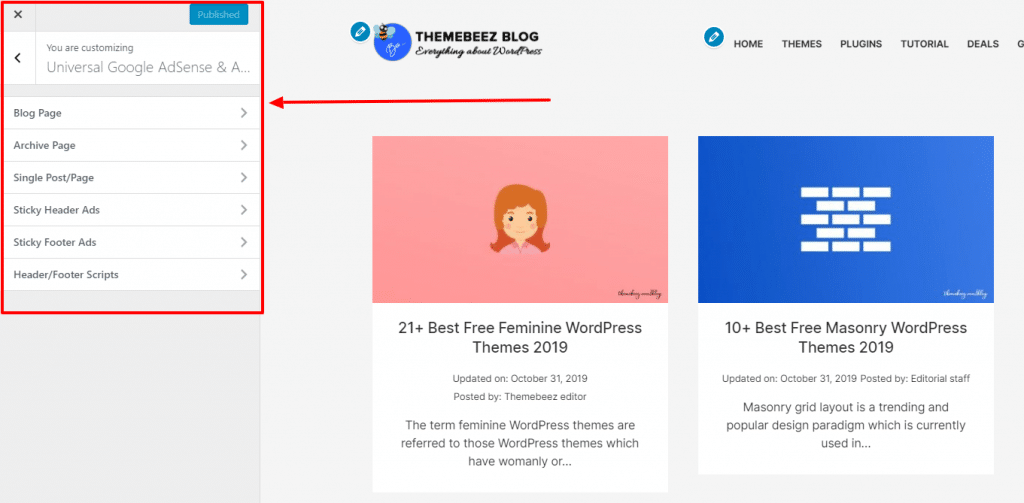
Navigate back to Dashboard > Appearances > Customizer > Universal Google AdSense and Ads Manager panel. You will see exactly the same options that are visible in the image above. There you can try to add ad code at Single Post/Page. Please have patience and play around with the options available inside Single Post/Page.
Once you paste Google AdSense code at Single Post/Page make sure you click on the Publish button at customizer. Browse your blog detail or a single page. Verify that you see ads at your pages or if not a yellow box. If ads worked for you I will assume that you can insert additional ads codes on other pages like archive, search & blog page. If the ad does not show up then refer to the step 7 guide below.
Shortcode
Shortcode functionality in WordPress is intended for developers, designers & for those who wish to display specific content in the desired location. You can display an advertisement using a shortcode anywhere on your website.
Note: The above Google AdSense Ad is added there using UGAAM shortcode.
Since here at this website, we are using Universal Google AdSense and Ads Manager plugin I was unable to embed the shortcode of UGAAM. In order to learn more about the UGAAM shortcode visit the documentation page of the UGAAM plugin.
Step 7: Troubleshooting & Frequently Asked Questions
Below are the few questions that we often get from users. If your question is not answered please feel to ask that in the comment section below.
Q. Where can I download Universal Google AdSense and Ads Manager plugin?
A. You can download Universal Google AdSense and Ads Manager plugin from official WordPress’s plugin repo.
Q. Do Universal Google AdSense and Ads Manager plugin works with cache plugin(s)?
A. Yes, UGAAM works with cache plugins. We have tested it with wp rocket, auto-optimize, SG Optimizer, Lite speed cache plugins.
Q. Do I need to clear the cache after I add the Google AdSense ads code?
A. Yes, It’s better to clear the cache at the end after adding the ad code.
Q. I inserted the ad code but ad(s) is not being displayed. What could be the reason?
A. Make sure you do not have any ad blockers enabled. Also, make sure you’ve followed each and every step mentioned above.
Q. I inserted the ad code but the yellow box or Google AdSense ad never is never displayed. Why?
A. There could be a few reasons behind it. If this is the case feel free to contact us at our support forum.
Q. I am having a hard time going through these steps. Do you offer paid service to insert Google AdSense Ads?
A. Yes, we do offer a paid WordPress service called “Setup Google AdSense“. If you wish you can purchase that from our WordPress Services page.
Conclusion
This article was intended to layman users to make them able to add Google AdSense to WordPress websites. I hope this article helped you add Google AdSense on your WordPress site. We at the themebeez.com team created Universal Google AdSense and Ads Manager plugin to help users like you. As UGAAM does not have any built-in warning feature to alert you when you are using maximum Google AdSense code on the same page please make sure to follow the AdSense program policies to avoid account closure.
If you found this article helpful to add Google AdSense to WordPress website make sure you share it in your social profiles.
Do you have any questions regarding Google AdSense & UGAAM plugin? Let me know in the comment section below.
