Are you looking to monetize your website displaying Google AdSense, Custom Advertisements or Advertisements From Other Networks? We do have simple & flexible solution for that. Install Universal Google AdSense And Ads Manager plugin to manage your ads.
1. INTRODUCTION
Fascinate Pro is a professional version of free WordPress theme, Fascinate, which is mainly targeted for the bloggers who publish posts related to travel, gourmet, people and their lifestyle, fashion trends, latest technology etc. Fascinate Pro is a beautifully designed theme with many advance customization options for managing colors, typography, layouts, widgets and many more. Fascinate Pro is 100% responsive, multiple device compatible and cross browser compatible theme. Fascinate Pro is developed following WordPress standards and is a translation ready theme.
2. THINGS TO KNOW
Recommended Plugins
- Themebeez Toolkit: Themebeez Toolkit is a companion plugin for all our themes. This plugin consists of theme information and extends functionality of theme. Note: To import demo contents, this plugin is required.
- Contact Form 7: Contact Form 7 is a simple plugin which can be used to create contact forms and use those forms on your pages.
- Regenerate Thumbnails: Regenerate Thumbnails is a plugin to regenerate thumbnails defined in theme. Note: If you’re switching theme, then it is essential to install this plugin and regenerate all the thumbnails.
Thumbnail Sizes
To minimize the page load time, Fascinate has built in option to load image in background, technique also known as Lazy Load.
- 800px by 450px – It is the most used thumbnail size. It is used in blog/home page, archive/category page, search page, post widget and other areas.
- 450px by 450px – This thumbnail size is used only for Related Posts section of Post’s Single.
Note: If you’ve switched theme, don’t forget to regenerate all the thumbnails. Otherwise images will be displayed in undesirable sizes. Use Regenerate Thumbnails, plugin to regenerate thumbnails.
3. THEME INSTALLATION
Via WordPress Dashboard
You can install theme via WordPress admin dashboard. This will be the first process of installing theme in your WordPress website. The instructions are as follows:
- Navigate to Appearance > Themes.
- Click on Add New button.
- Search and install this theme from WordPress repository or manually install the downloaded theme.
- To manually install the theme, click on Upload Theme button.
- Upload theme file with .zip file format and click on Install Now button.
- After theme installation is completed, activate the theme.
Via FTP Client
- Login to your server’s file manager with FTP client with your FTP user-name & password.
- Navigate to WordPress installation folder.
- Navigate to ../wp-content/themes/ folder.
- Upload theme folder with the FTP client into ../wp-content/themes/ folder.
- Login to WordPress dashboard & activate the theme.
4. ACTIVATING LICENSE KEY
On purchasing Fascinate Pro theme, you’ll receive mail containing a download link for downloading theme file and License Key. Use that key to activate the theme. Instructions for activating License Key are as follow:
- Navigate to License Manager.
- Insert the License Key in the field below the title FASCINATE PRO LICENSE.
- Click on Save button.
Note: Activating License Key will allow you to receive regular update of the theme. And if you face any problem while activating the License Key, contact us.
5. IMPORTING DEMO CONTENTS
Note: To import demo contents, you must first install Themebeez Toolkit plugin. And after that install all the required plugins.
- Install and activate Themebeez Toolkit plugin.
- Once activated, you’ll see Fascinate Pro menu on your dashboard. Click on it.
- Then click on Starter Templates tab.
- There, you will see available demos and click on import which you like most.
- Wait ( approx: 3 – 5 minutes ) to get all data to be imported as per your internet speed.
- When demo import is done, now its time to setup widgets, banner, menu and few other settings according to your requirements.
6. MANAGE MENUS
This theme has two menu locations defined. They are:
- Primary Menu: This menu location is used to set primary menu in header.
- Top Header Menu: This menu location is used to set links at the top section of header.
To manage menus, navigate to Appearance > Menus on your WordPress dashboard.
Here’s a video guide to set up menu:
7. MANAGE WIDGETS & WIGET AREAS
In this theme, there are altogether Four widget areas and Three custom widgets. All the widget areas and widgets are managed at Appearance > Widgets.
The four widget areas are as follow:
- Sidebar
- Footer Left, Footer Middle and Footer Right
- Header Advertisement
- Instagram Widget Area
- Woocommerce Sidebar
Sidebar: This widget area holds the widgets displayed at sidebar.
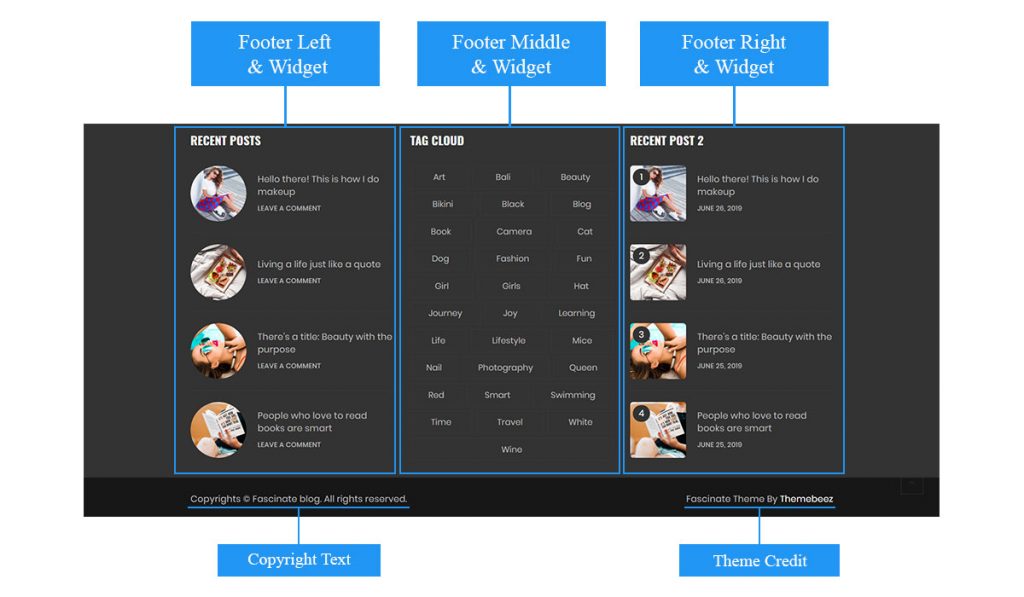
Footer Left, Footer Middle and Footer Right: These widget areas are used to display widgets at the footer.
Header Advertisement: This widget area holds the widget for displaying advertisement. Note: Header Advertisement works only when header layout seven is selected.
Instagram Widget Area: This widget area holds the Instagram widget which is displayed above the footer.
Woocommerce Sidebar: This widget area holds the woocommerce widgets and is only displayed on woocommerce related pages.
The three widgets are as follow:
- FP: Author Widget
- FP: Posts Widget
- FP: Social Widget
- FP: Instagram Widget
- FP: Category Widget
FP: Author Widget – This widget displays information about the author. Here detail about the author comes from a page created for author detail.
FP: Posts Widget – This widget displays recent posts. There are two layouts. Select one of the layout to display recent posts.
FP: Social Widget – This widget displays the social links.
FP: Instagram Widget – This widget displays Instagram images.
FP: Category Widget – It is a custom category widget that displays list of selected categories.
Here’s a video guide to manage Widget Areas and Widgets:
8. THEME CUSTOMIZER
Almost all of the customization are included inside Theme’s Customizer. The theme customizer includes:
- Site Layout
- Site Preloader
- Site Header
- Site Pages
- Site Carousel
- Featured Categories
- Breadcrumb
- Pagination
- Site Image
- Site Sidebar
- Site Footer
- Post Excerpt
- Site Background
- Social Share
- Site Typography
- Site Color
- And so on
To find and manage customization options, navigate to Appearance > Customize.
9. MANAGE SITE LAYOUT
There are two layouts for displaying your website. One is Boxed Layout and other is Full Width Layout.
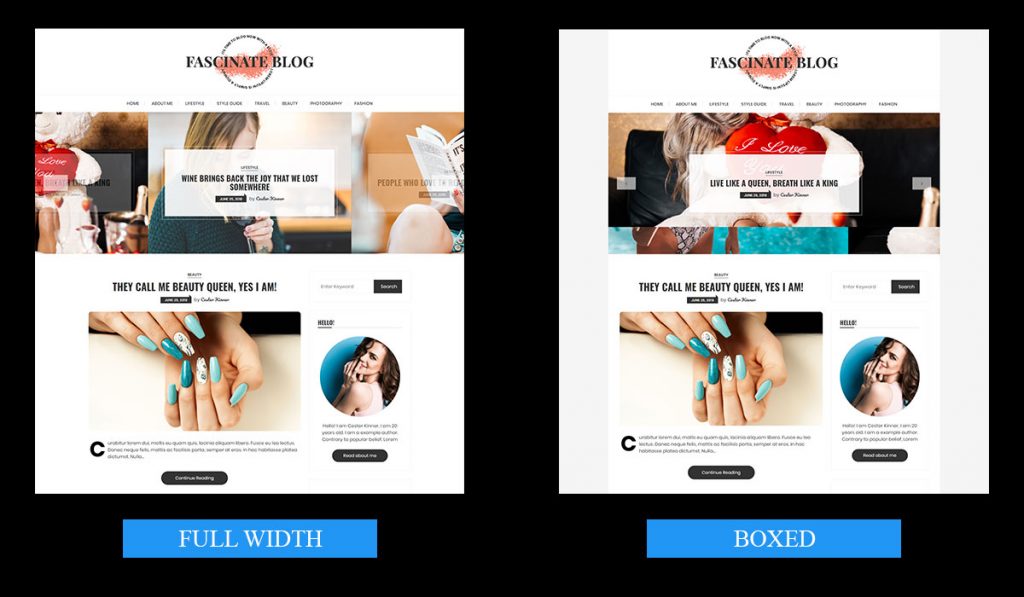
To manage the site layout, follow the instructions below:
- Navigate to Appearance > Customize > Site Layout.
- Select any one of the layout from between Boxed Layout and Full Width Layout.
10. MANAGE HEADER
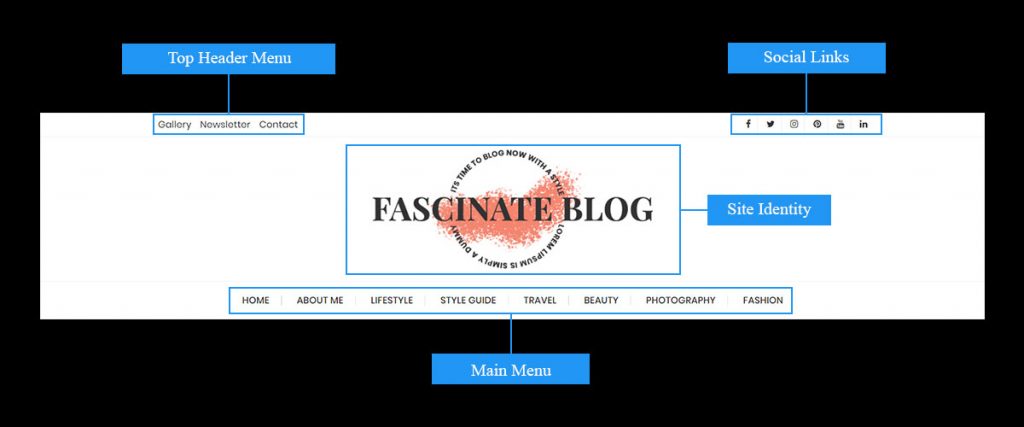
To manage or customize header section, navigate to Appearance > Customize > Site Header. There you’ll find following sections:
- Site Identity(Logo): This section contains the options for managing Site Logo or Site Identity.
- Site Icon(Favicon): This section contains option to set Site Icon or Favicon.
- Header Layout: This section contains the options for selecting header layouts and configuring background colors for different sections of header.
- Header Menu: This section contains color options and typography options related to primary menu.
- Header Links: This section contains typography options and color options for social icons, search icon and top header links.
- Header Image: This section contains options to set background image for header. Note: If you’ve set header image but header image does not show up, then minimize the opacity of background color of header sections. The options are available inside Header Layout section.
Here’s a video guide to configure Site Identity:
Here’s a complete video guide to configure site header:
11. MANAGE SLIDER SECTION
To manage slider/carousel follow the instructions below:
- Navigate to Appearance > Customize > Site Carousel.
- Inside this section, you’ll find multiple options.
- Display Carousel: This option let’s you display carousel section in your home page.
- Carousel Category: This option let’s you select a post category. Posts of the category that you’ve selected will be displayed as carousel items.
- No of Carousel Items: This option let’s you set the no of posts or say carousel items to be displayed.
- Display Carousel Content: This option let’s you display post information.
- Carousel Layout: Select any one of the two carousel layouts that you prefer on your home page.
- Enable Spacing: This option let’s you set space around the carousel.
- Carousel Height: This options let’s you set height of the carousel. The height works only for the larger devices where as smaller devices use the default height.
- Post Title Typography: This section contains options for managing typography of Post Title of posts displayed for carousel.
- Once you’ve configured the options, click on Publish button to save it.
Note: Site Carousel only works for the home page. It will not work on any other pages or a static home page.
Here’s a complete video guide to manage carousel section in Fascinate Pro:
12. FEATURED CATEGORIES
Featured Categories section is displayed below the carousel in home page.
To manage this section, navigate to Appearance > Customize > Featured Categories. Here you’ll find the following options:
- Display Section – To show/hide featured categories section in home page.
- Select Categories – Categories selected are displayed.
- Select Image Thumbnail Size – Image with the selected thumbnail size will be displayed.
- Select Number of Columns – Categories will be displayed in grid with select number of columns.
Note: If you’ve selected the categories, and the selected categories are not selected, then, it is because you’ve set images for selected categories.
To add image for category, follow instructions below:
- Navigate to Posts > Categories.
- Edit any one of the categories.
- Below Description option field, you’ll find option field, Image.
- Upload image for category and then click on Save button.
You can also add to image during creating a category.
13. MANAGE FOOTER
The footer area is divided into two areas, one to display footer widgets and other to display copyright and theme credit. To manage the footer widgets, navigate to Appearance > Widgets. And to manage copyright and credit information, navigate to Appearance > Customize > Site Footer. You’ll also find color options as well as typography options for footer sections and footer elements.
14. MANAGE HOME PAGE
By default Fascinate uses blog page as home page. To manage it, navigate to Appearance > Customize > Site Pages > Blog Page. Configure options available in the section to manage contents. Also to configure carousel section of home page instructions are mentioned above in Site Carousel.
The options available in Appearance > Customize > Site Pages > Blog Page are as follows:
- Page Layout: Select any one layout from the available layouts for listing posts on Blog Page.
- Post Content: This section contains options to manage post contents such as featured image, excerpt, post meta etc.
- Sidebar Position: Select the sidebar position for Blog Page.
- Post Title Typography: Configure typography of post title for posts displayed on Blog Page.
- Post Excerpt Typography: Set font size of post excerpt.
Here’s a video guide to manage blog page:
15. MANAGE ARCHIVE/CATEGORY PAGE
To manage Archive/Category page, navigate to Appearance > Customize > Site Pages > Archive Page. Configure the options available to manage contents of Archive/Category page.
16. MANAGE SEARCH PAGE
To manage Search page, navigate to Appearance > Customize Site Pages > Search Page. Configure the options to manage contents of Search Page.
17. MANAGE POST SINGLE
The post detail is displayed in post page or post single page. To manage the contents of displayed in post page, navigate to Appearance > Customize > Site Pages > Post Single. The options available in this section are categorized as follow:
- Post Content: Contains options for managing post’s contents such as post meta, featured image etc.
- Author Section: Contains option for managing author section.
- Related Posts Section: Contains option for managing section that displays related posts.
- Related Section Title Typography: Manage font size, line height, letter spacing, text transformation etc. of related section’s title.
- Relate Section Post Title Typography: Manage font size, line height, letter spacing, text transformation etc. of posts’ title of related section.
- Sidebar: Contains option for enabling common sidebar positions for all the posts.
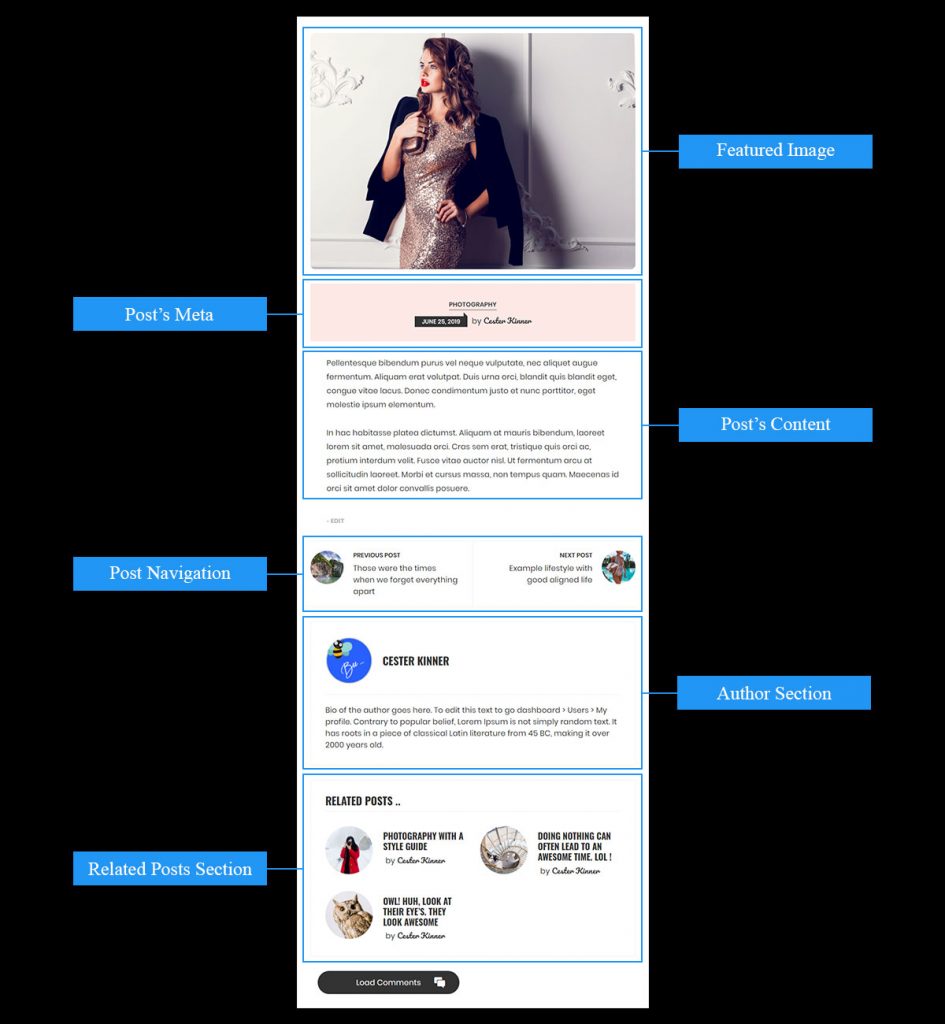
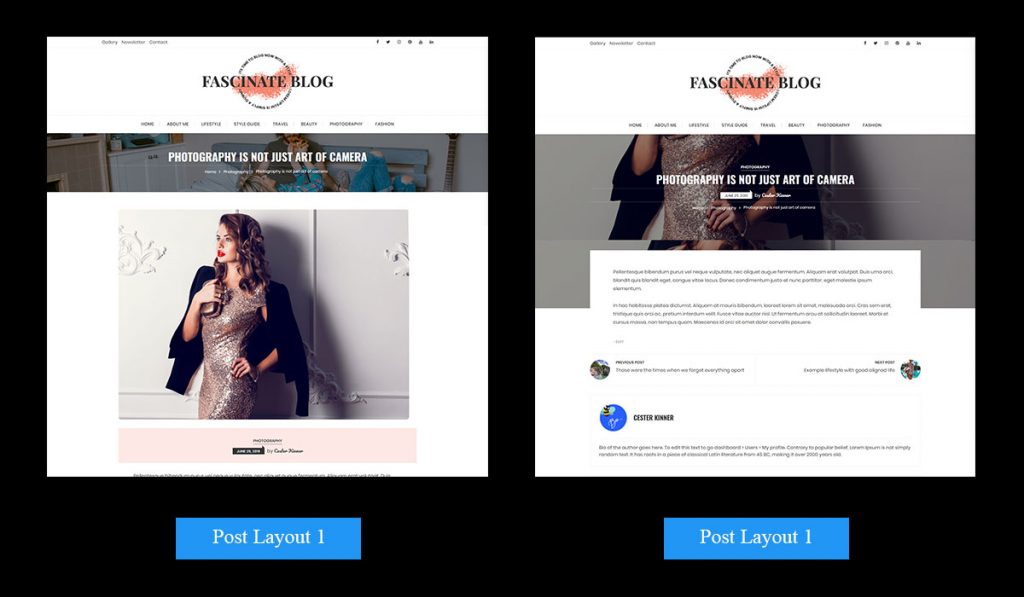
Post single has two layouts. They can be managed when creating new post or editing existing post.
To set a layout for a post, follow the instructions below:
- Navigate to Posts > All Posts.
- Click on any one of the posts to edit.
- On the right side of the editor, you’ll find an option, Layout.
- Select any one of the layout options and save the post.
Also to set sidebar for individual posts, follow the instructions below:
- Navigate to Posts > All Posts.
- Click on any one of the posts to edit.
- On the right side of the editor, you’ll find an option, Sidebar Position.
- Select any one of the sidebar position and save the post.
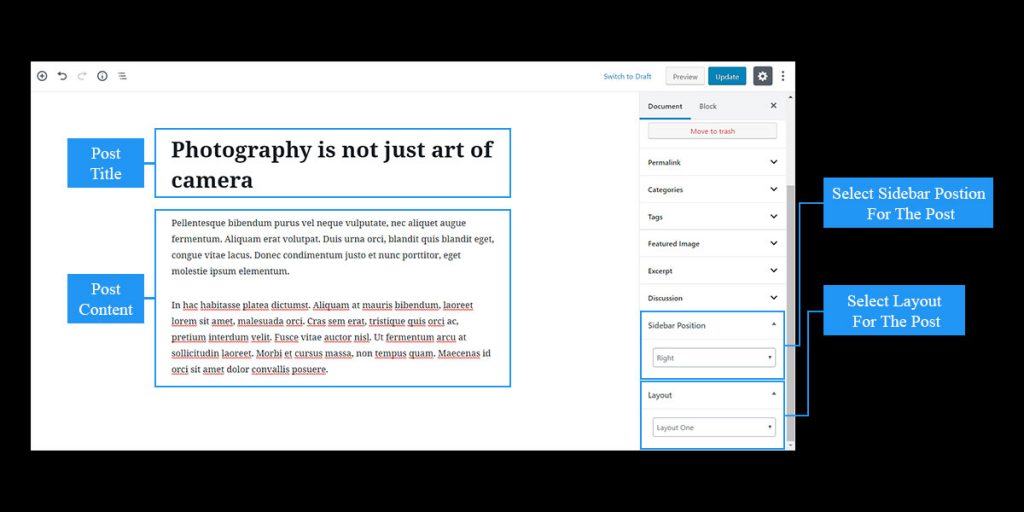
Below is the video guide to change individual post’s layout and sidebar position:
18. MANAGE PAGE SINGLE
To manage page contents, navigate to Appearance > Customize > Site Pages > Page Single. Configure options available in the section.
Page do have layout selection and sidebar position selection similar as to post. For that you’ve to edit page.
19. MANAGE PRELOADER
Preloader is an animation that is displayed before any page loads. To manage it, navigate to Appearance > Customize > Site Preloader.
The options that are available for preloader are as follow:
- Enable Preloader – On enabling this option, preloader will be enabled.
- Preloader Content – Select any one preloader content type.
- Preloader Layout – Select any one of the predefined preloader layout. Note: This option is enabled when Preloader Content type is Default Layouts.
- Preloader Image – Set custom image for the preloader. Note: This option is enabled when Preloader Content type is Custom Image.
- Preloader Height & Width – Set height and width of preloader.
- Preloader Color – Set color for preloader object and background.
Below is the video guide to manage preloader:
20. MANAGE POST EXCERPT
Excerpt is a short post content that is displayed instead of full post content. To manage excerpt. follow the instructions mentioned below:
- Navigate to Appearance > Customize > Post Excerpt.
- There you’ll find following options:
- Show Post Link: This option displays link of post at the end of the excerpt.
- Post Link Title: This option lets you set title of the post link. Note: This option is activated only when Show Post Link is enabled.
- Post Link Style: This option lets you select the style with which you want to display the post link. Note: This option is activated only when Show Post Link is enabled.
- Post Link Color: Manage text color and background color of post link.
- Make changes to the options.
- Click on Publish button to save.
21. MANAGE SOCIAL SHARE LINKS
To manage social share links, follow the instructions mentioned below:
- Navigate to Appearance > Customize > Social Share.
- There you’ll find following options:
- Display Social Share: This option lets you show or hide social share links.
- Share On Pages: Under this section you’ll find options to show or hide social share links on different pages.
- Share On Sites: Under this section you’ll find options to show or hide particular social link on which you want posts or pages to be shared.
- Make changes to the options.
- Click on Publish button to save.
22. MANAGE BREADCRUMB

Breadcrumb is managed via Appearance > Customize > Breadcrumb. You will find following options here:
- Display Breadcrumb – To hide/show breadcrumbs.
- Breadcrumb Color – Manage text color, background color, border color and mask(overlay) color of breadcrumb section.
- Background Image – Set background image for breadcrumb section.
23. MANAGE Pagination
To manage pagination, follow the instructions mentioned below:
- Navigate to Appearance > Customize > Pagination.
- There you’ll find following options:
- Select Pagination Alignment: This option lets you align the pagination.
- Select Pagination Layout: There are 5 pagination layout variations. This option lets you select pagination variation of your choice.
- Make changes to the options.
- Click on Publish button to save.
24. MANAGE SIDEBAR
Sidebar options can be found inside Appearance > Customize > Site Sidebar. The options that are inside this section are as follow:
- Enable Sticky Sidebar: This option on checked, sets sidebar to be sticky.
- Hide Sidebar On Small Devices: This option on checked, hide sidebar on small devices.
- Enable Global Sidebar Position: This option on checked, enables all the pages of your website have common sidebar position.
- Global Sidebar Position: You can select any one position for sidebar with this option.
- Sidebar Color: Manage text color, background color, border color, widget title color etc. of sidebar.
25. MANAGE SITE BACKGROUND
You can set Background Image or Background Color for your website. Background image and background color is set common for all of the pages.
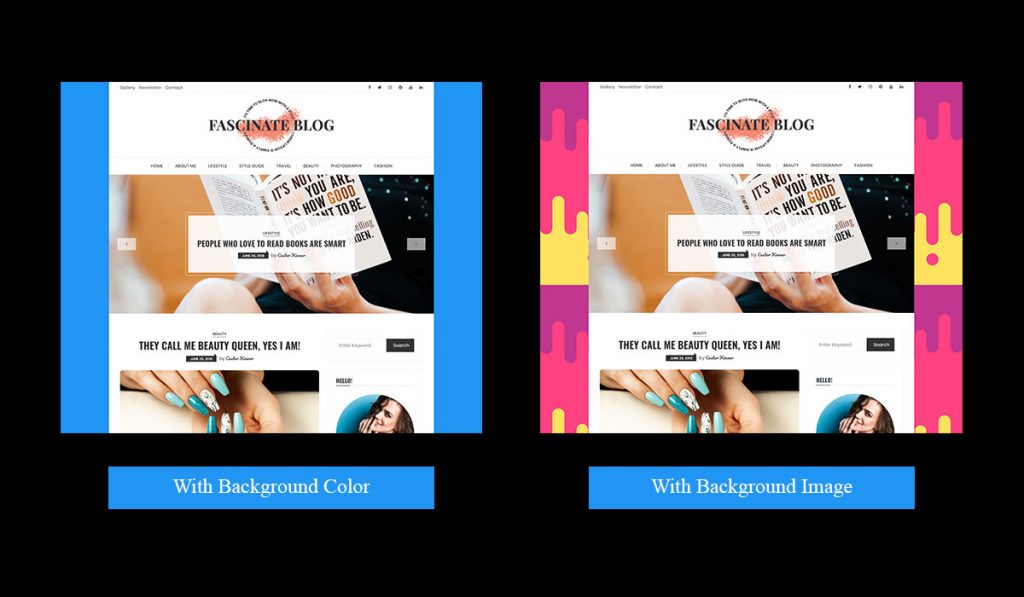
To set background image or background color, navigate to Appearance > Customize > Site Background.
Note: Background image or background color only works when Site Layout is set to Boxed Layout.
Here’s a video guide to manage background color and background image:
26. MANAGE SITE IMAGE
To manage images, navigate to Appearance > Customize > Site Image.
- There you’ll find following options:
- Enable Lazy Loading: This option lets you enable images to be lazy loaded.
- Enable Fallback Image: In case when you’ve not set featured images in posts or pages, you can display fallback image when the posts are listed.
- Set Fallback Image: This option is activated when Enable Fallback Image option is enabled. This option lets you set fallback image.
- Make changes to the options.
- Click on Publish button to save.
27. GENERAL THEME COLOR
To manage general colors, follow the instructions mentioned below:
- Navigate to Appearance > Customize > Site Color > Global Color.
- There you’ll find following options:
- Primary Theme – Color: This option sets primary color of the theme.
- Secondary Theme – Color: This option sets secondary color of the theme.
- Body – Text Color: This option sets color of paragraph texts and links.
- Headings(H1 – H6) – Text Color: This option sets color of headings text.
- Global Link – Hover Color: This option sets color of links on mouse hover.
- Global Link With Background – Color: This option sets color of links which has background color set.
- Global Link With Background – Hover Color: This option sets hover color of links which has background color set.
- Global – Border Color: This option sets border color of elements whose border is set.
- Make changes to the options.
- Click on Publish button to save.
To manage colors of icons representing different post formats, follow the instructions below:
- Navigate to Appearance > Customize > Site Color > Post Format Icon Color.
- Change text color and background color of icon.
- Click on Publish button to save.
28. THEME TYPOGRAPHY
Body Typography
To manage body typography, follow the instructions mentioned below:
- Navigate to Appearance > Customize > Site Typography > Body Typography.
- There you’ll find following options:
- Font Family: This option sets font family of body texts.
- Font Size: This option sets font size of body texts.
- Font Weight: This option sets font weight of body texts.
- Line Height: This options sets line height of body texts.
- Make changes to the options.
- Click on Publish button to save.
Heading Typography(H1-H6)
To manage headings typography, follow the instructions mentioned below:
- Navigate to Appearance > Customize > Site Typography > Heading Typography.
- There you’ll find option such as font family, font size, font weight, text transform, line height, font style and letter spacing, for setting headings typography.
- Make changes to the options.
- Click on Publish button to save.
Post Title Typography
Post Title Typography is for title of posts displayed in the site. To manage post title typography, follow the instructions mentioned below:
- Navigate to Appearance > Customize > Site Typography > Post Title Typography.
- There you’ll find only option to change font family of post title of posts.
- Make changes to the options.
- Click on Publish button to save.
Widget Title Typography
Widget Title Typography includes both sidebar and footer widgets’ title. To manage widget title typography, follow the instructions mentioned below:
- Navigate to Appearance > Customize > Site Typography > Widget Title Typography.
- There you’ll find option such as font family, font size, font weight, text transform, line height, font style and letter spacing, for setting widget title typography.
- Make changes to the options.
- Click on Publish button to save.
Post Meta Typography
Post Meta Typography contains typography options for post meta such as post author, posted date and post categories. To manage post meta typography, follow the instructions below:
- Navigate to Appearance > Customize > Site Typography > Post Meta Typography.
- There you’ll find option such as font family, font size, font weight, text transform, line height, font style and letter spacing, for setting post meta typography.
- Make changes to the options.
- Click on Publish button to save.
29. NEED HELP OR SUPPORT?
If you find any problems or any issues regarding Fascinate, feel free to contact us though live chat, support forum or you can mail us at [email protected].
30. SUPPORT US
If you like our theme, please give a nice review, click here. We’ll be much more delighted and would appreciate it.
Thank you.