If you are looking for Orchid Store WordPress theme documentation then this is the page. This is going to be full phase documentation for Orchid Store WordPress theme. If you found any of your queries not answered by this documentation guide do kindly feel to ask your questions & queries at Orchid Store free theme support forum
Please click image if text written at image is not visible properly
THEME INSTALLATION
Every WordPress themes can be installed in two different ways. Here is the installation process below. Watch the video below.
VIA WORDPRESS DASHBOARD:
You can install a theme via the WordPress admin dashboard. This will be the first process of installing a theme on your WordPress website. The instructions are as follows:
- Navigate to Appearance > Themes.
- Click on Add New button.
- Search and install this theme from the WordPress repository or manually install the downloaded theme.
- To manually install the theme, click on Upload Theme button.
- Upload a theme file with .zip file format and click on Install Now button.
- After theme installation is completed, activate the theme.
VIA FTP CLIENT:
- Login to your server’s file manager with FTP client with your FTP user-name & password.
- Navigate to WordPress installation folder.
- Navigate to ../wp-content/themes/ folder.
- Upload theme folder with the FTP client into ../wp-content/themes/ folder.
- Login to WordPress dashboard & activate the theme.
ACTIVE HOMEPAGE
Since Orchid Store is an eCommerce WordPress theme. It has to be used activating the static front-page.
Let’s go ahead & activate a static front-page for Orchid Store. Please follow the instruction below:
- Go to Dashboard > Pages
- Create a new page with the title “Home”
- Publish or Update page “Home”
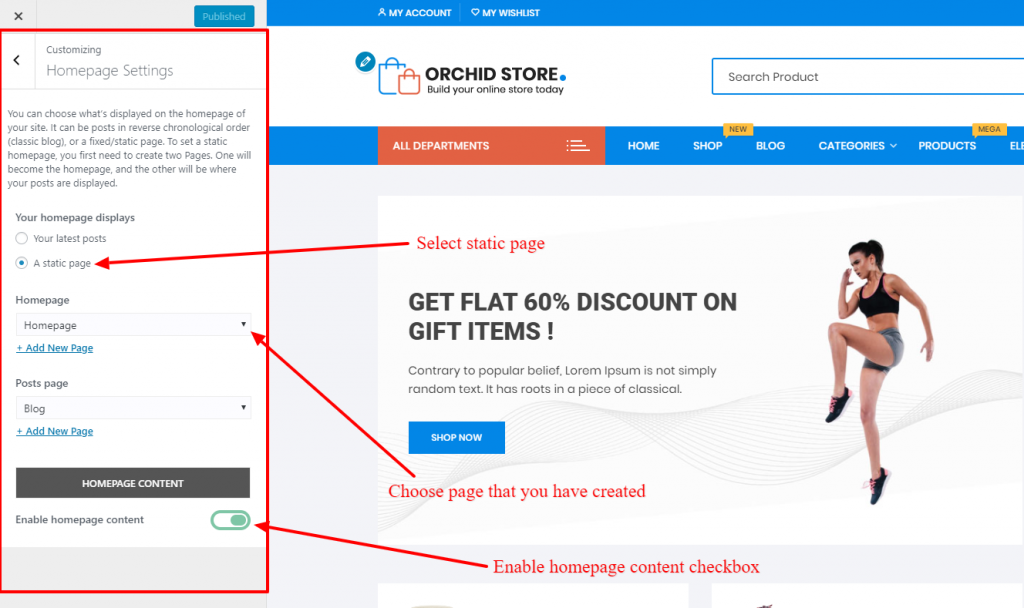
- Now go Dashboard > Appearances > Customizer > Homepage setting
- Choose static page option & enable homepage content checkbox.
- Done. Now your homepage has been activated.
Note: If you would like to build your homepage with elementor make sure you turn off “Enable homepage content” checkbox.
RECOMMENDED PLUGINS
Here is a list of few essential WordPress plugins that need to be activated in order to get full functionality in Orchid Store WordPress theme.
- Woocommerce
- YITH wishlist : for wishlist feature
- YITH quick view : for quick view feature
- Themebeez toolkit – to import demo data, icons for menu items & activate a mega menu
- Elementor: Optional plugin if you wish to extend Orchid Store using page builder
Note: You will also get recommended plugins admin notice at the dashboard while installing Orchid Store WordPress theme. If you haven’t activated those plugins yet. Please do kindly install & activate them now.
THUMBNAIL IMAGE SIZES
To minimize the page load time, Orchid Store uses appropriate image thumbnail sizes. Below are the thumbnail sizes that are used in the Orchid Store WordPress theme.
OS BANNER WIDGET:
OS: Banner widget uses two different image sizes. The bigger image at left side slider uses images of 900px width by 500px height. Whereas, thumbnail used on right side of the banner ( two small images ) is 450px width by 250px height.
BLOG POSTS FEATURED IMAGE:
The recommended thumbnail size for blog posts featured image is above 850px width by 450px height
OS: ADVERTISEMENT WIDGET:
Please use image of 1920px width by 600px height
PAGE HEADER OR BREADCRUMB IMAGE:
Recommended size is 1920px width 600px height
WOOCOMMERCE PRODUCT IMAGE:
Recommend size is above 800px width by 800px height with pure white background colour
OS: SERVICE WIDGET SMALL ICONS:
You can get small icons from flaticons or icons8 for free. Recommend size is 64px width by 64px height. Make sure you use a white colour image.
Note: If you’ve switched theme, don’t forget to regenerate all the thumbnails. Otherwise, images will be displayed in undesirable sizes. Use Regenerate Thumbnails, plugin to regenerate thumbnails.
WISHLIST
In order to implement a wishlist feature in Orchid Store WordPress theme, we have used a 3rd party plugin by YITH called YITH wishlist. Once this plugin is installed, we are supposed to assign it a wishlist page. In order to create & assign a wishlist page kindly follow the steps below.
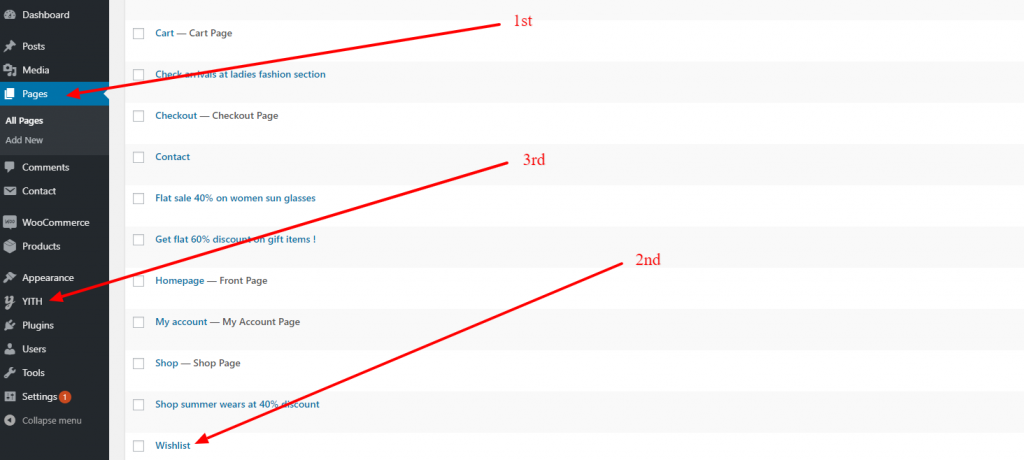
- Navigate to Dashboard > pages
- Create a page with title “Wishlist” & click publish
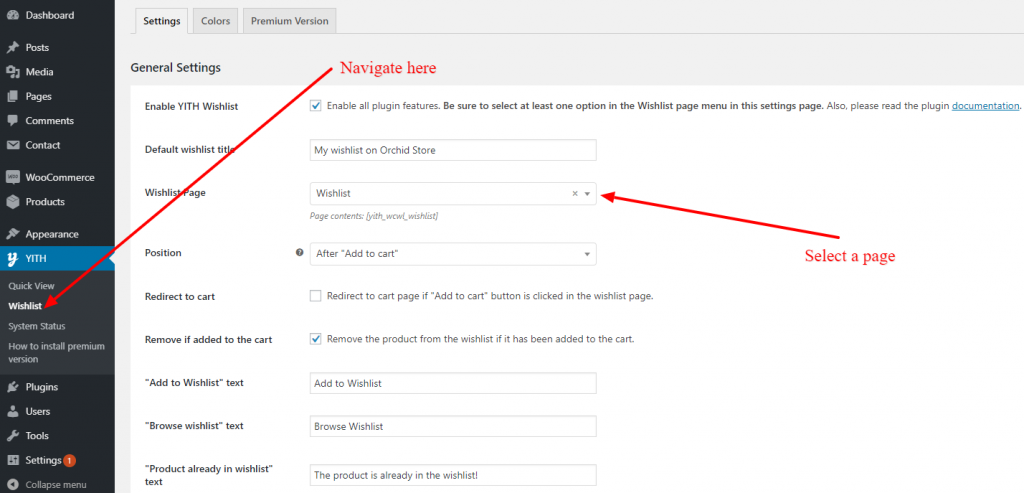
- Go to dashboard > YITH > Wishlist
- Select the page that you have create for wishlist. For this example, our page is “wishlist”.
- Click save button
- Done.
IMPORT DEMO DATA
To import demo contents, you must first install & activate Themebeez Toolkit plugin. If you haven’t done yet do kindly active it.
Importing demo content is not compulsory. Import demo data speedups the work for you to quickly set up your online shop just like in our demo.
- Install and activate Themebeez Toolkit plugin.
- Once activated, you’ll see Orchid Store menu on your dashboard. Click on it.
- Then click on Starter Templates tab.
- There, you will see available demos and click on import which you like most.
- Wait ( approx: 3 – 5 minutes ) to get all data to be imported as per your internet speed.
- When demo import is done, now its time to setup widgets, banner, menu and few other settings according to your requirements.
Note: Please do make sure you install all recommended plugins before you import demo data. If you face any issue while importing demo data please do kindly let us know.
MANAGE WIDGETS
Since everything in Orchid Store WordPress theme is a widget, you can swipe their widget area to change the look & feel. Watch the video below.
Let’s look at all the available widgets in the Orchid Store WordPress theme.
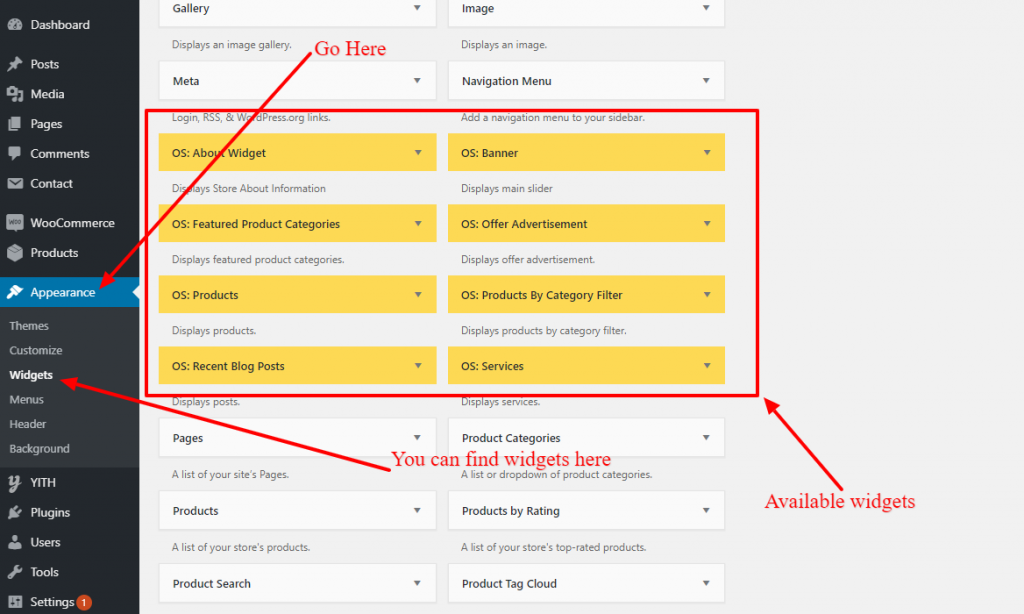
Here is a brief description of what these widget do & look like:
OS: ABOUT WIDGET:
About widget is used to display store information. It has an option to display like logo, store phone number, address, description, social media & store operational time.
Note: You can use os: about widget at footer widget area or sidebar
OS: BANNER WIDGET:
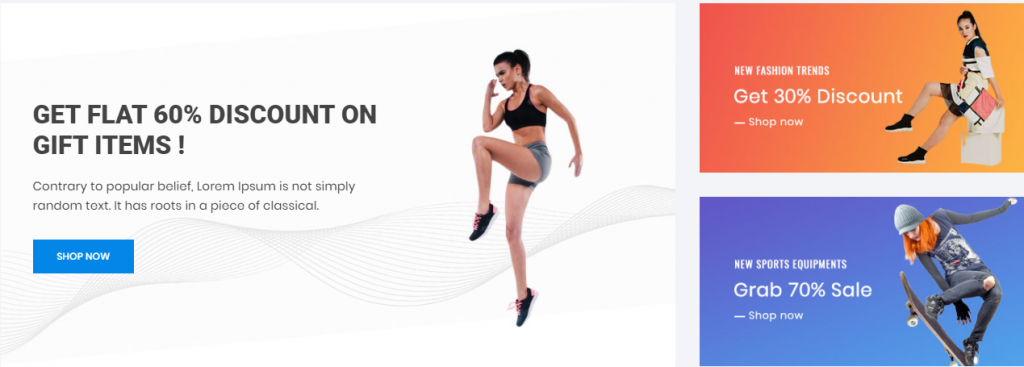
This is how the os: banner widget look like. You can use this Os: Banner widget in Front-page widget area.
Note: You can use the banner widget at Front-page widget area.
OS: FEATURED PRODUCT CATEGORIES
This widget helps to display the selected category. It looks like the below screenshot.

Wondering how to set pictures in these categories?
In order to set pictures in these categories do kindly follow the instruction below.
- Go to Dashboard > Products > Category
- Edit the category
- You will notice a file upload field just next to save button
- Click at upload field & select picture from media
- Click Save.
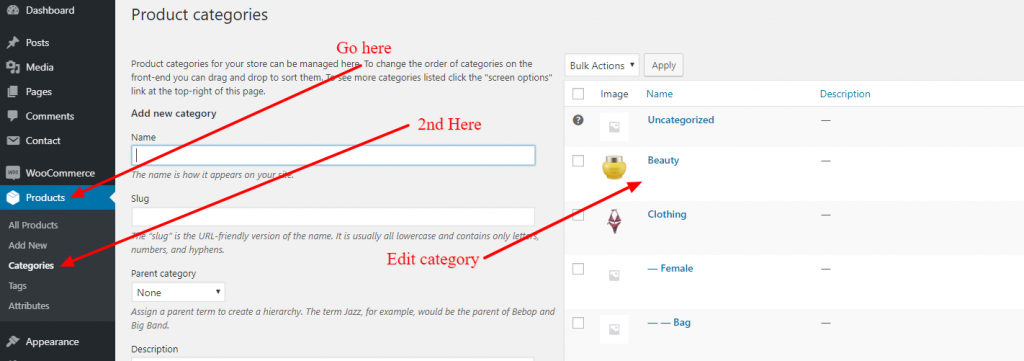
Note: You can use the featured categories widget at Front-page widget area.
OS: OFFER ADVERTISEMENT WIDGET
We also call this widget a Call to action ( CTA ) widget. It helps to display offer advertisement. You can use this widget
Note: You can use the offer advertisement widget at Front-page widget area.
OS: PRODUCT WIDGET
Os: product widget is the main widget in Orchid Store WordPress theme. Product widget displays Woocommerce products at your website. At the moment of writing this documentation guide, we do have two types of product widget. They are as follows.
- Grid view – Displays products in a grid
- Slider view – Displays product in the carousel slider
Note: You can use the product widget at Front-page widget area.
OS: PRODUCTS BY CATEGORY FILTER
This is just a product widget but we have made this a separate widget because it has a capability to display different categories along with the product in that specific category. Below is the screenshot of how the products by category filter look like in front-end.
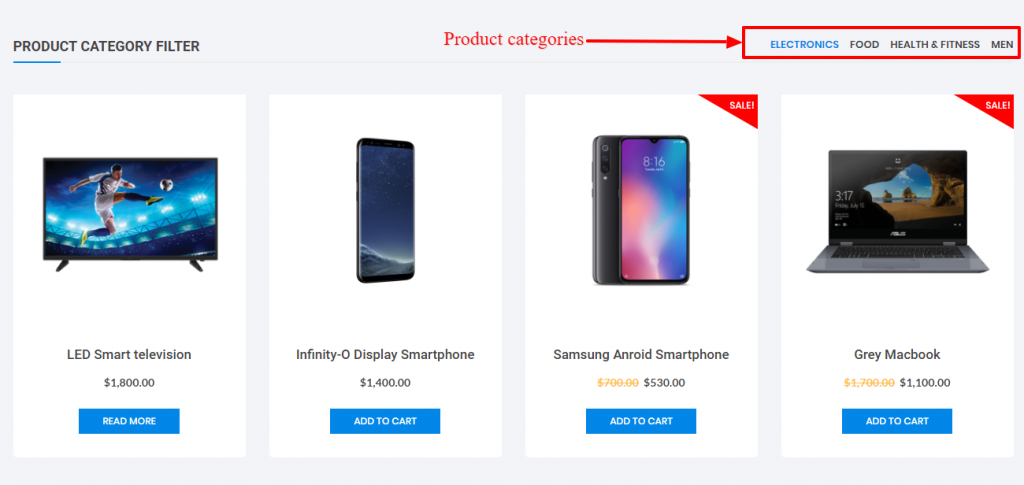
Note: You can use the product widget at Front-page widget area.
OS: RECENT BLOG POSTS
It helps to display your blog posts in the front page. Simply publish a post with featured image & use this widget at front page widget area.
OS: SERVICE WIDGET
We also call this widget a CTA widget. It has three columns where you can write a small title & a few lines of description along with the small image icon. You can get small icons from flaticons or icons8 for free. Recommend size is 64px width by 64px height. Make sure you use a white colour image.

REST WORDPRESS & WOOCOMMERCE DEFAULT WIDGETS
There is plenty of other default WordPress & Woocommerce under Dashboard > Appearances > Widgets. We hope you know about them. Most of the default WordPress & Woocommerce default widgets are designed to be used at sidebar or footer widget area.
MANAGE HEADER
Header layout can be managed from Dashboard > Appearances > Customizer > Header.
Regarding Menu item as always, they can be managed from Dashboard > Appearances > Menus
SITE LOGO OR SITE TITLE
Site logo or title can be changed from Appearances > Customizer > Header > Site Identity. The recommended size for the logo is 260px width by 70px height.
HEADER TOP ITEMS & SOCIAL ICONS
Header top items & social icons option is available at Appearances > Customizer > Header > Top Header. Where My-account & Wishlist automatically is displayed.
Update: since version 1.1.4 now you have option to select either 2 static links or a menu. Choose the header top menu location at Dashboard > Menus.
PRODUCT SEARCH, WISHLIST ICON & MINI CART
You can either enable or disable product search, wishlist icon & mini cart from Appearances > Customizer > WooCommerce Elements
SPECIAL/CATEGORY MENU AT HEADER

Special menu at Orchid Store WordPress theme can be used to display categories or any menu item links. It supports icon & menu description too. Unfortunately, the mega menu for the special menu is not available in the free version but it is available in pro version.
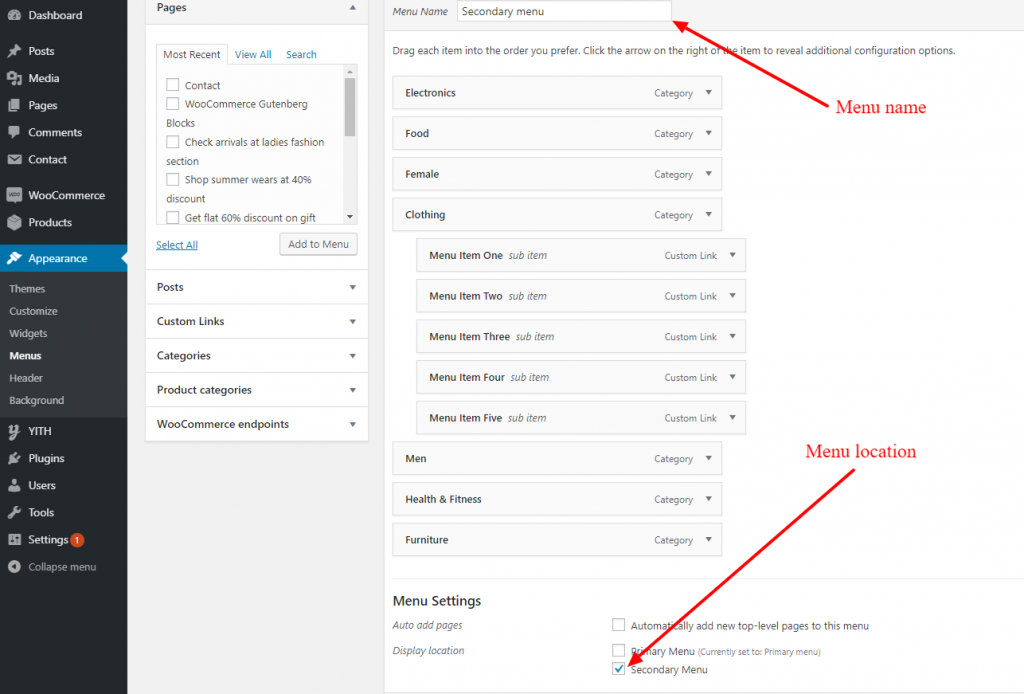
FYI: Please be informed that the maximum dept of menu items at a special menu in free versions just two.
PRIMARY NAVIGATION/MENU
This is the most important part to understand. This is how primary navigation looks like ( Screenshot below).

You can set/manage menu items to this location from Dashboard > Appearances > Menus
PRIMARY MENU LOCATION & MEGA MENU
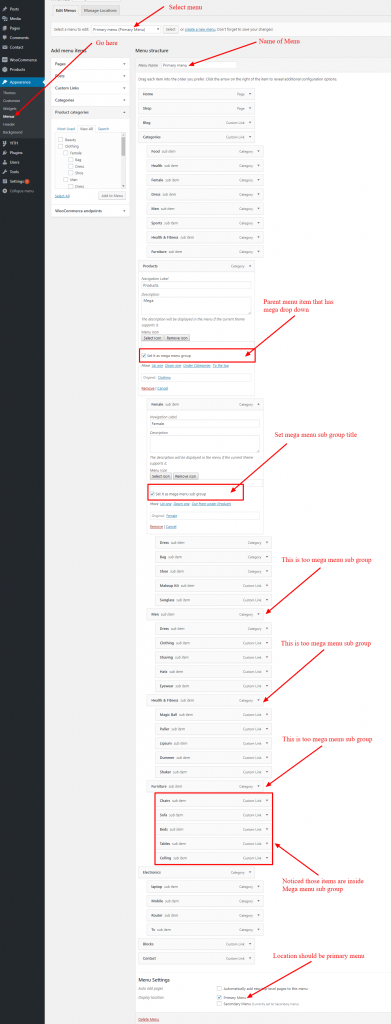
Not sure yet how you can do it? Watch the video below.
Note: If above screenshot is not visible properly, do click on the image
The location of the primary menu should be check as “primary menu” ( Look at the bottom of the screenshot ) then click save.
MENU DESCRIPTION OR MENU LABEL

In order to enable a menu description or menu label click on screen option toggle button.
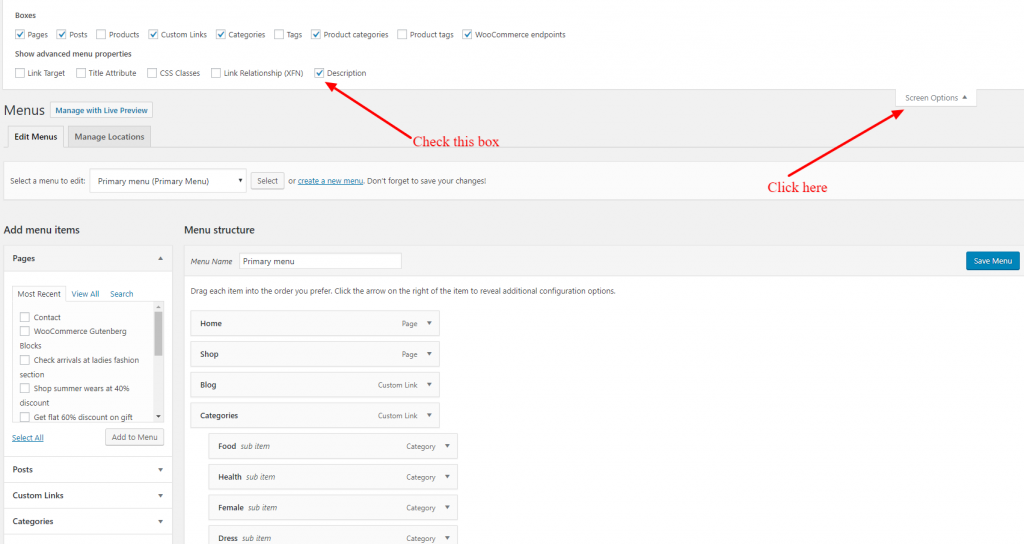
Once you check the description, click save menu button. Now you will see a menu description box inside all menu items.
MEGA MENU:
Orchid store free version is capable to display only links at the mega menu & setting up mega menu at Orchid Store is pretty straight forward. All you need to do is to check set it as mega menu group for the parent menu item that has a mega dropdown. Megamenu can have max up to 6 columns.
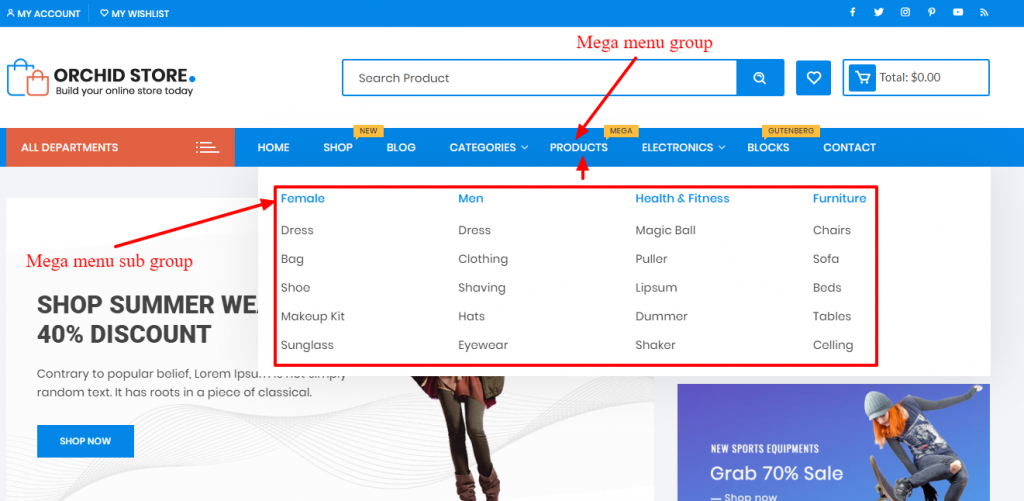
At the above screenshot example ( Female, Men, Health & Fitness, Furniture ) were mega menu subgroup. Make sure you maintain dept of menu items & put the mega menu child items inside mega menu subgroup.
CUSTOMIZER: OPTIONS & SETTINGS
Orchid Store is totally built with WordPress Live customizer. You can enable or disable options & settings from the customizer. You can access customizer as always from Dashboard > Appearances > Customizer
Let’s jump straight to the options & settings that are at customizer.
SITE PAGES
All options related to different pages like Blog page, Search page, Post single page, Default page, Page header image/breadcrumb image are located at Dashboard > Appearances > Customizer > Pages.
These are the options available under Dashboard > Appearances > Customizer > Pages.
- Page header/breadcrumb image option
- Enable/disable category
- Enable/disable post date
- Enable/disable post author
- Sidebar position
- Display/Hide featured image
COLOURS
Orchid store WordPress theme has 4 different colour options which are as follows:
- Primary theme skin colour
- Secondary theme hover & special menu at header colour
- Background colour
- Site title & description text colour
In order to change colours, please go to Dashboard > Appearances > Customizer > colors
FOOTER
Willing to display copyright text at footer? Is yes please go to Dashboard > Appearances > Customizer > Footer. Here you can set copyright text, Payment getway image, Number of footer columns.
Note: Recommended image size of payment getway image is 300px width by 20px height.
Note: You cannot remove Orchid Store by Themebeez.com text at the footer in Orchid Store free version. If you wish to remove that author credit text kindly purchase Orchid Store Pro.
EXCERPT
Excerpt refers to the short description. If you wish to change the number of the Words that are currently being displayed at blog, archive & search pages you can change here. Excerpt setting can be found at Dashboard > Appearances > Customizer > Excerpt
BACKGROUND IMAGE
Willing to display background image at your website? You can set background image or colour from Dashboard > Appearances > Customizer > background
WOOCOMMERCE SETTINGS
All the options related to WooCommerce can be found at Dashboard > Appearances > Customizer > WooCommerce . Followings are the options & settings available.
- Shop page – product columns
- Related product columns
- Cross-sell product columns
- Upsell products columns
- Product images aspect ratio
- Shop notice
- WooCommerce sidebar option
- Product added to cart message
- Product removed from cart message
- Cart item updated message
ELEMENTOR: OPTIONAL
Orchid store is partially compatible with the Elementor page builder. We are not saying fully because it has limitations too. As we know everything has a limitation after some point. Talking about limitation at Orchid Store you can use widgets of Orchid Store through the Elementor page builder but you will not have full control over those widgets that Elementor has offered.
Watch the video below which shows basic walk through ion how you can build your homepage with Orchid Store theme & Elementor.
Let’s look at the Elemetor page builder widget section.
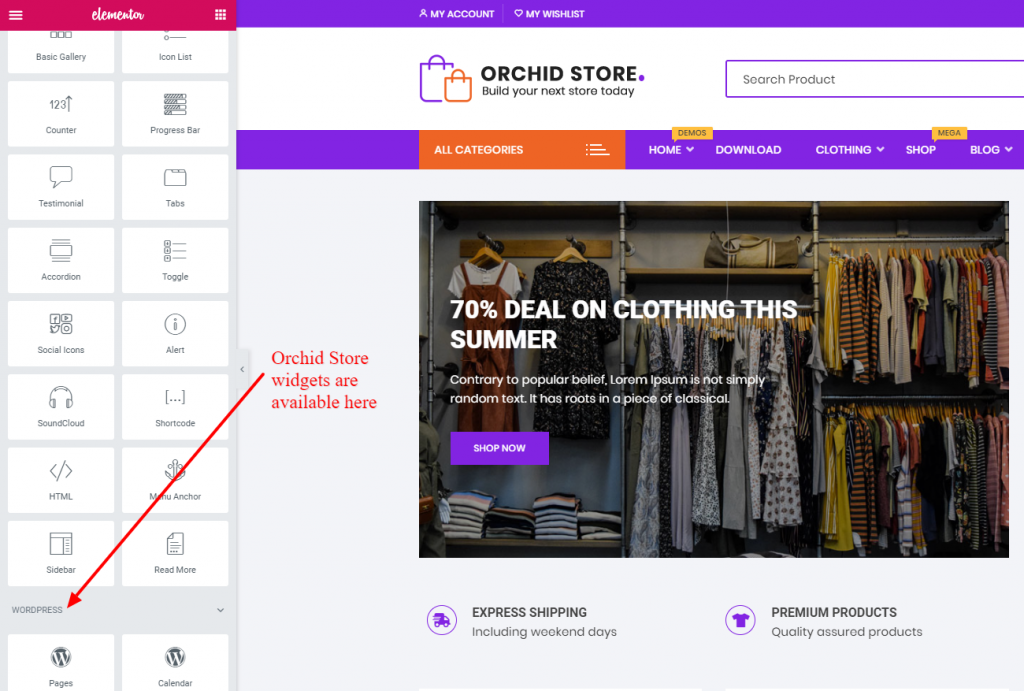
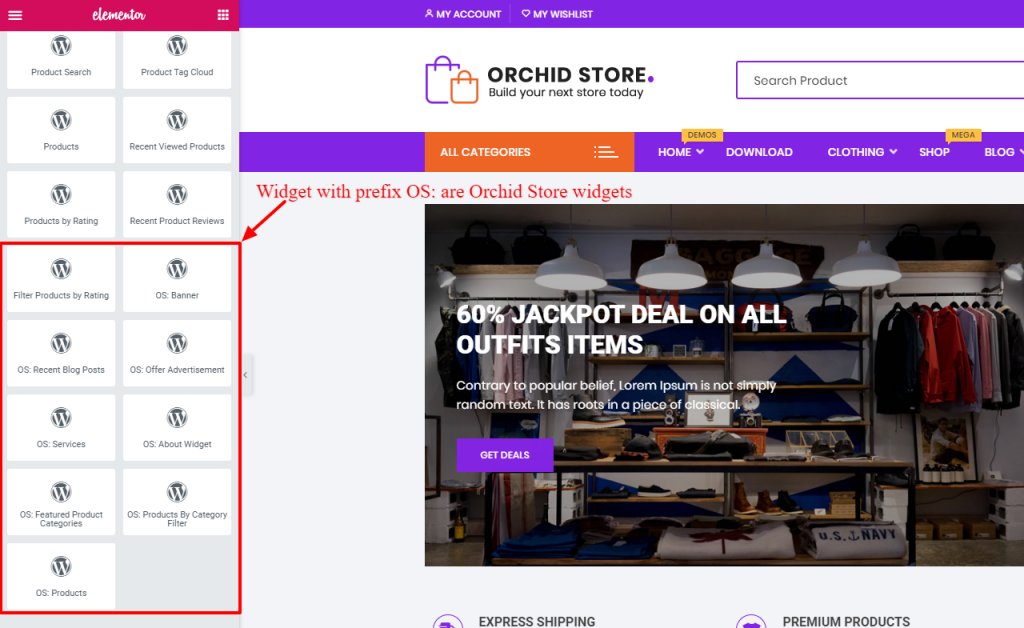
You can drag and drop these widgets & you can also use default Elementor widget in between of those widgets. Hence, building custom pages with Elementor page builder & Orchid Store theme is possible.
TWEAK ELEMENTOR SETTINGS
We recommend you to change few Elemetor settings before you start building pages with Elemetor.
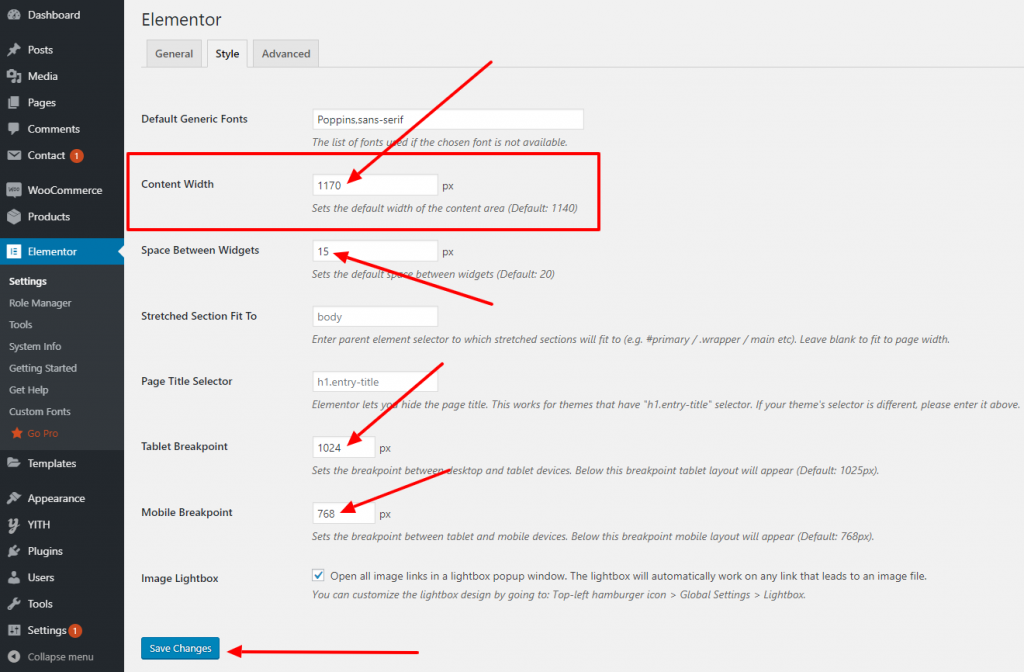
Followings are the settings that need to be changed while using Elemetor page builder.
- Change Elementor container size to 1170px
- Change space between widgets to 15px
- Change Tablet breakpoint to 1024px
- Change enable font awesome 4 support to yes from the Advanced tab
- Disable default Elementor font & color option from General tab
GDPR COMPLIANCE
The Orchid store theme itself does not store any user data. However other services like WooCommerce, addons for WooCommerce & WordPress do store & collect user data.
If you wish to display a simple notifier to notify users that your site makes uses of cookies and to comply with EU GDPR regulations you can install Simple GDPR Cookie Compliance plugin made by us.
If you would like to have a demo of how cookie compliance you can visit our blog.
TRANSLATE ORCHID STORE
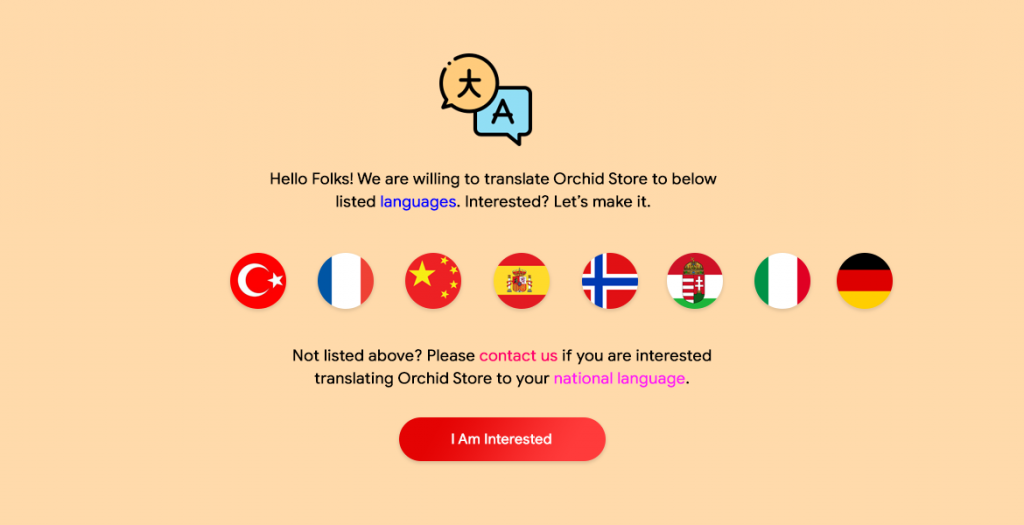
Are you willing to translate Orchid Store Theme in your own language? Orchid Store is translation ready & has a POT file inside the theme file language folder. If you wish to contribute to translating Orchid Store please feel free to let us know at Orchid Store support forum.
GET SUPPORT
Do you need help while using Orchid Store WordPress theme? If yes please do kindly let us know at Orchid Store support forum or through the support page. We will try our best to get back to you within 24 hours.