Are you looking to monetize your website displaying Google Adsense, Custom banner ads or advertisement from other networks? We do have simple & flexible plugin for that.
Check Universal Google Adsense & Ads manager Plugin Here: CLICK HERE
INTRODUCTION
Hello users! This post is going to be brief user documentation for style blog WordPress theme. Almost everything that you might need is documented here for style blog. If you couldn’t find any information that you are looking for please let is know.
GETTING STARTED
First of all, Thank you so much for purchasing this theme and for being our loyal customer. You are awesome!
You are entitled to get free lifetime updates to this product + exceptional support from the us directly.
THEME INSTALLATION ( THROUGH WORDPRESS DASHBOARD )
You can install theme from wordpress admin dashboard. This will be the first process of installing theme in your wordpress website.
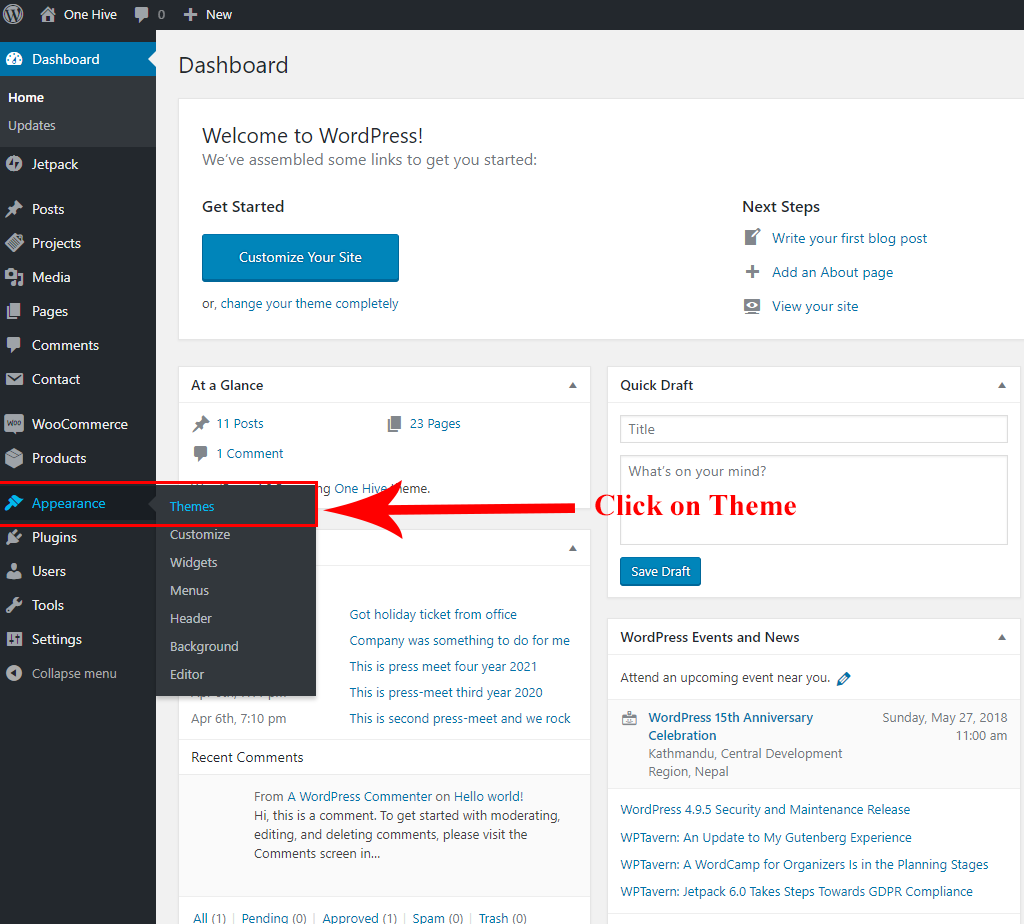
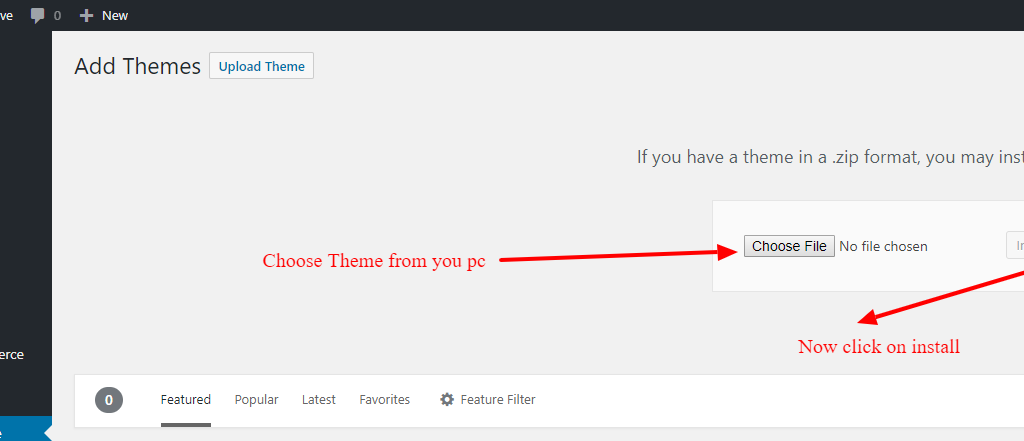
Select the theme from your computer ( ZIP file ) & hit install. After you install Activate theme.
DEMO IMPORT
- Install a plugin called “THEMEBEEZ: TOOLKIT” which is shown in the recommended section.
- After installing, Welcome Message will be popup and click on Get Started or go to Dashboard > Appearance > Style blog Info
- Install the plugins which are recommended from there and activate it.
- It’s time to import demo data. Go to Dashboard > Appearance > Import Demo Content or you can see option for Import Demo Content at THEMEBEEZ : TOOLKIT homepage.
- Now, you can see different available demos and click on import which you like most.
- Wait ( approx: 3 – 5 minutes ) to get all data to be imported as per your internet speed.
- When demo import is done, now its time to set up widgets, banner, menu and few other settings according to your requirements.
USE STATIC PAGE OR LATEST POSTS?
Do not set any static page to Home page here. This is blog theme, you are supposed to have your latest posts here.
If you have mistaken with the previous theme, you can change this setting from Dashboard > settings > reading or from customizer > homepage settings.
HEADER SECTION
Lean how to customize header of style blog theme.
HEADER TOP
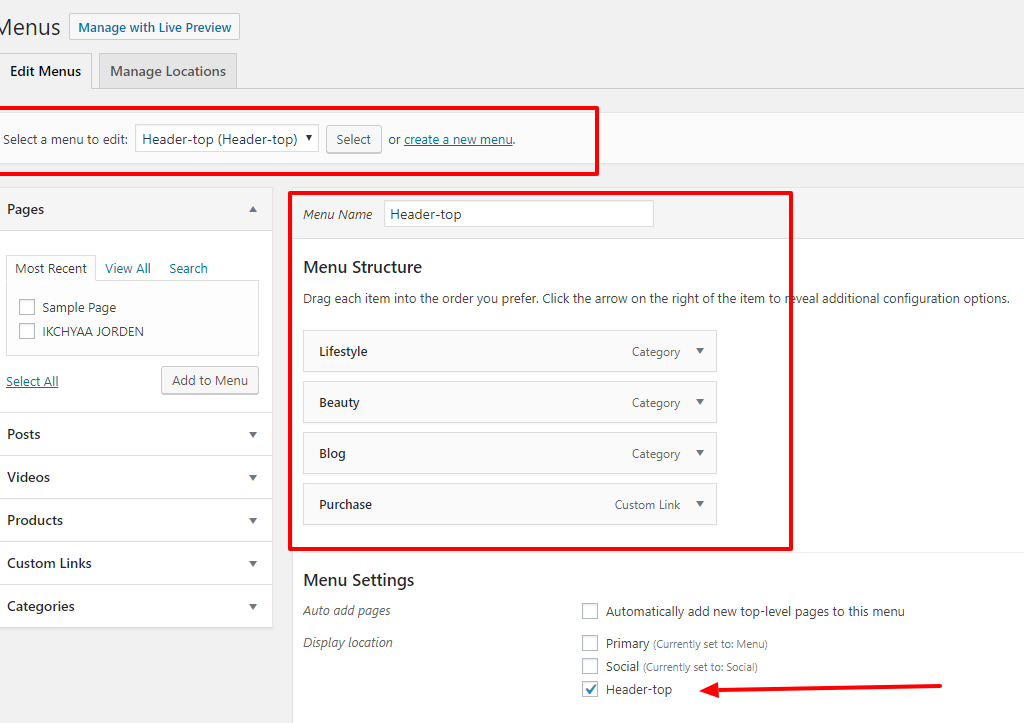
NAVIGATION MENU HEADER TOP LEFT
You can activate social menu from Dashboard > Appearance > Menu
- Create a menu
- Name it eg: Header top menu
- Assign some menu items and set to to Header top menu location
- Hit save!
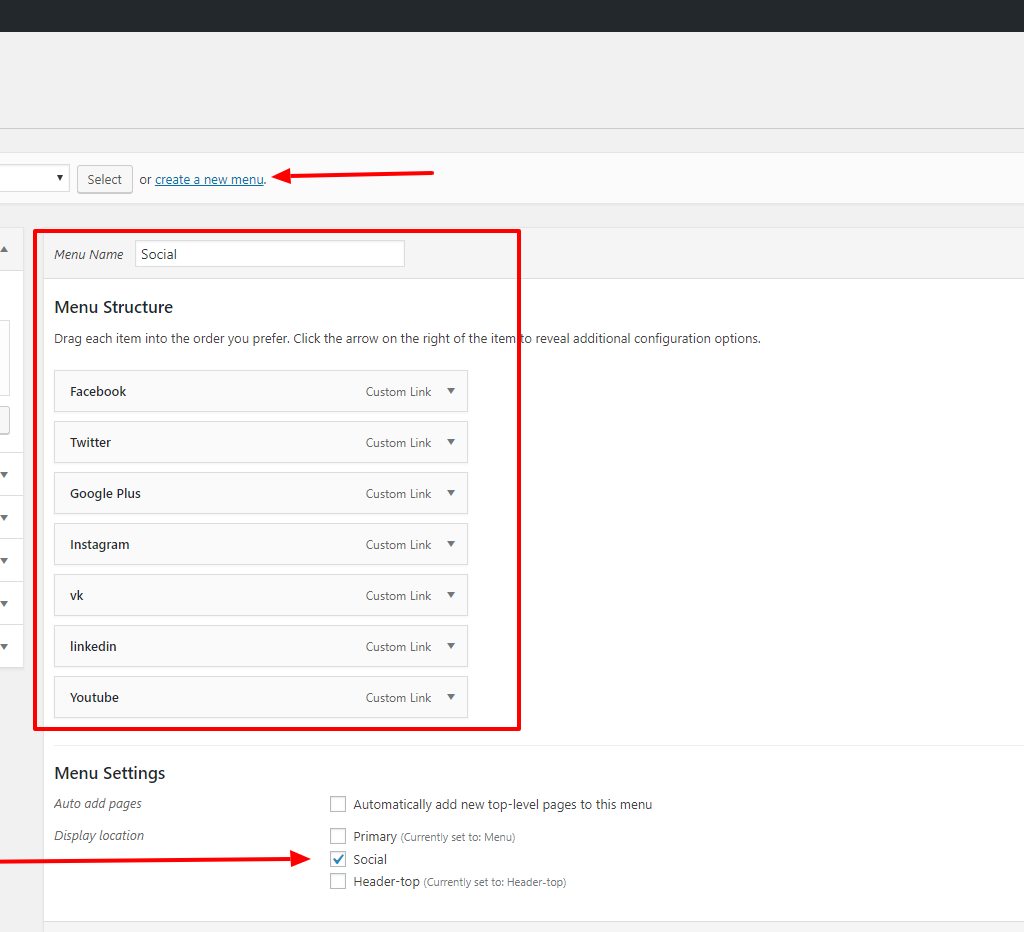
SOCIAL MENU HEADER TOP RIGHT
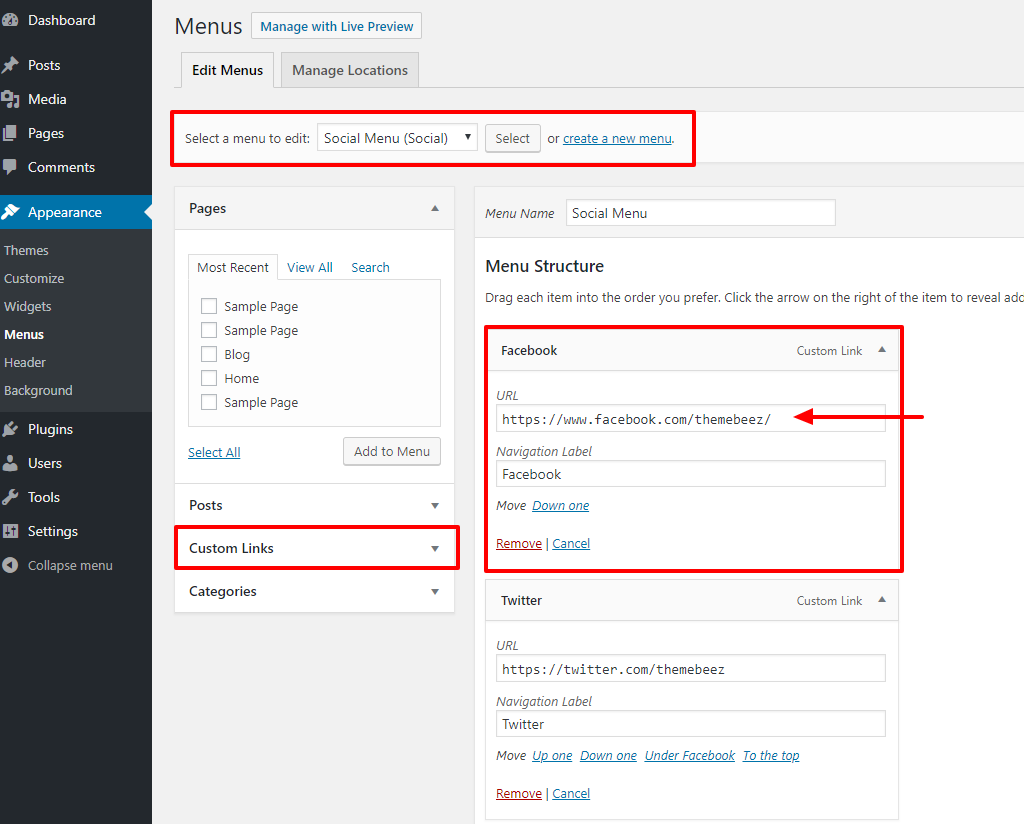
You can activate social menu from Dashboard > Appearance > Menu
- Create a New Menu
- Name it eg : Social Menu
- Add custom Links & Name it
- Supported Social icons are ( Facebook, Twitter, Google Plus, Instagram, Vk, LinkedIn, YouTube ).
- Select Display Location to Social & Hit save.
SITE LOGO
You can change website logo from Dashboard > Appearance > Customizer > Site identity. The recommended height of the logo is 90px. Where width recommended is around 250 – 350px.
Header two ( PRO ) : In this header, your logo comes at centre. You can set your own width & height. There is no restriction for this logo position size. Recommended size is 300 px width & 150px height.
ADVERTISEMENT
Recommended size of header advertisement is 768 * 90 px. You can use google ad-sense or something similar. To add advertisement here in this section go to Dashboard > Appearance > Widget & select HTML text box or image widget in Header advertisement Area Widget Option.
PRIMARY NAVIGATION MENU
You can add menu items from Dashboard > Appearance > Menu
- Create New Menu with Name eg: Primary Nav
- Assign some items
- IMPORTANT : Set menu location to primary
FEATURED POSTS SLIDER
In this section/slider you can display your latest posts or posts from any special category. To customize homepage featured slider navigate to Dashboard > Customizer > Homepage option > Featured slider.
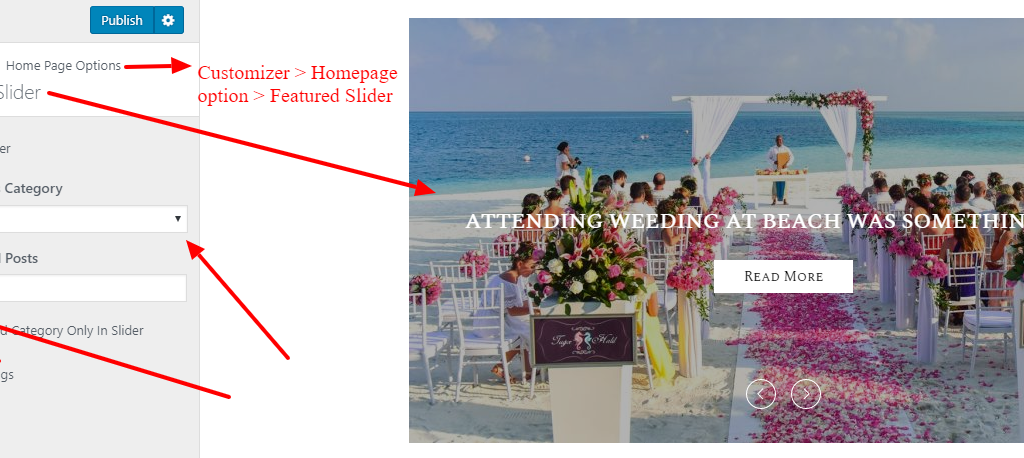
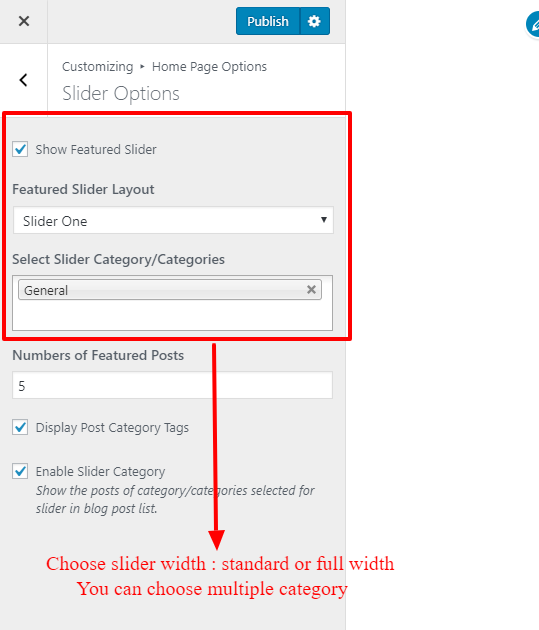
Featured slider Options ( PRO ) : In style blog plus you do have option for featured slider. You can choose between standard or full width slider. We aware of image size, make sure you use image bigger then 1200 px width & 700 px height . In pro version you can choose either 1 or multiple category to display your post.
RECENT POSTS
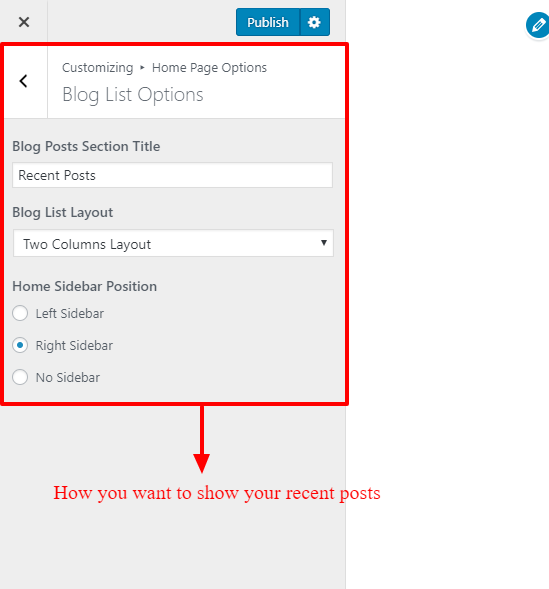
Free version : In free version there is only one option for recent posts. Featured image at left & post description at right.
Pro Version : In pro version you have multiple option to show related post. You can tweak & get your own style.Make sure you change the excerpt text size when you change the recent post layout in pro version.
AUTHOR WIDGET ( NEXT TO FEATURED SLIDER AT SIDEBAR )
To add a Author widget Navigate to Dashboard > Pages > Add New Page > Enter title. Add short description and feature image. Now navigate to Widget from Dashboard > Appearance > Widget. Select Author widget > Select Author page that you have created recently. Enter social icons.


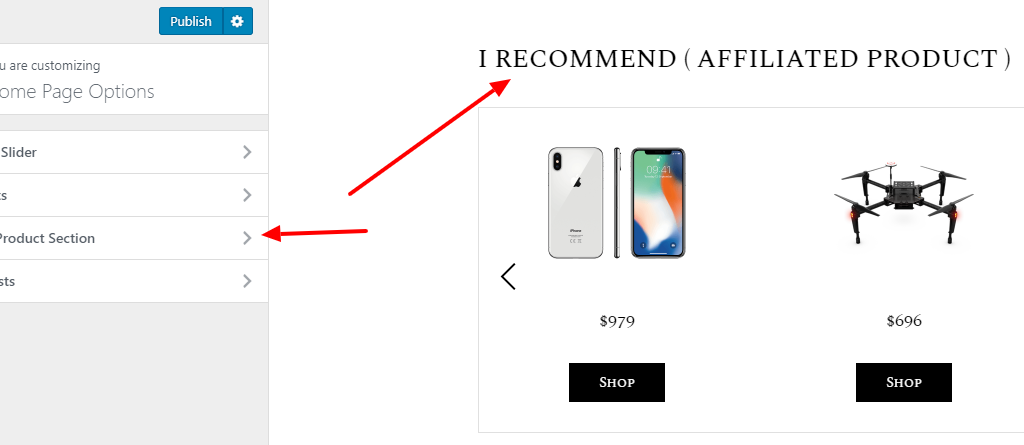
HOMEPAGE AFFILIATED PRODUCT SECTION ( PRO )
You can add product to this section from Dashboard > Product > Add New. Below picture will guide you for sure. To change the section title of this section you can do that from customizer.
Featured images for the affiliated product are NOT automatically cropped. We recommend 300 x 300 px size. This section is not Woo-commerce shop or any e-commerce shop, its just a external link affiliated product section.

VBLOG SECTION ( PRO )
You can add your Youtube videos in this section. To add video just nagivate to Dashboard > Videos > Add New. To change the section title of this section you can do that from customizer.Navigate to Customizer > Homepage option > Video post
Example for link to be entered : https://www.youtube.com/watch?v=JvZSZzL0hB4&t=2s


INSTAGRAM FEEDS SECTION ( PRO )
You can add your recent Instagram feeds in this section. You’ll need to install third-party Instagram Feed plugins such as Social Feed Gallery, Smash Balloon Social Photo Feed, Spotlight Social Feed, etc. to display your Instagram Feeds. Add Instagram widget provided using the plugin inside Instagram Widget Area.
COLOR OPTIONS ( PRO )
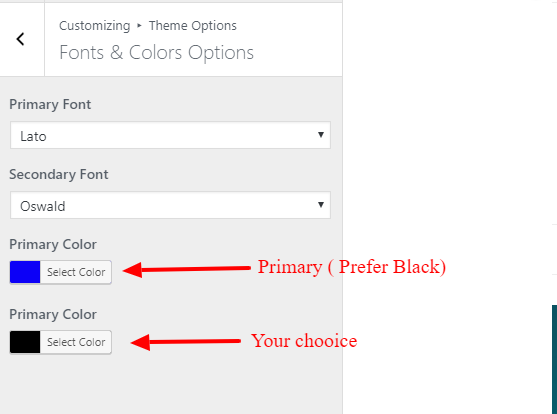
You can select any color you wish. We recommend Primary color Black & any color for secondary.
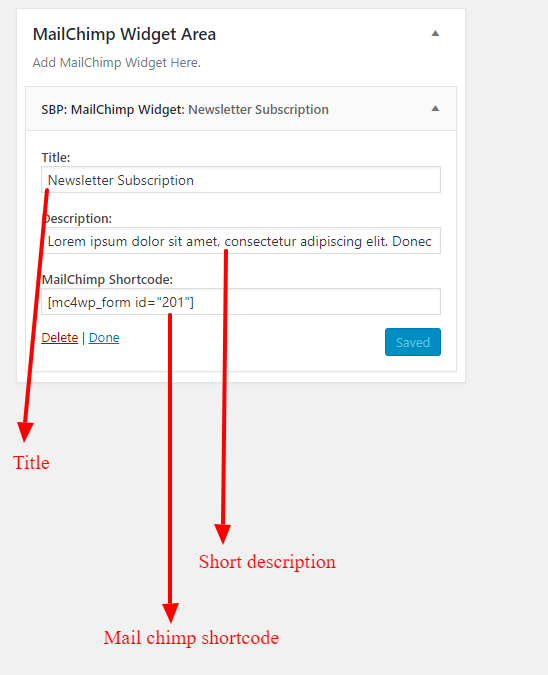
MAILCHIMP WIDGET ( PRO )
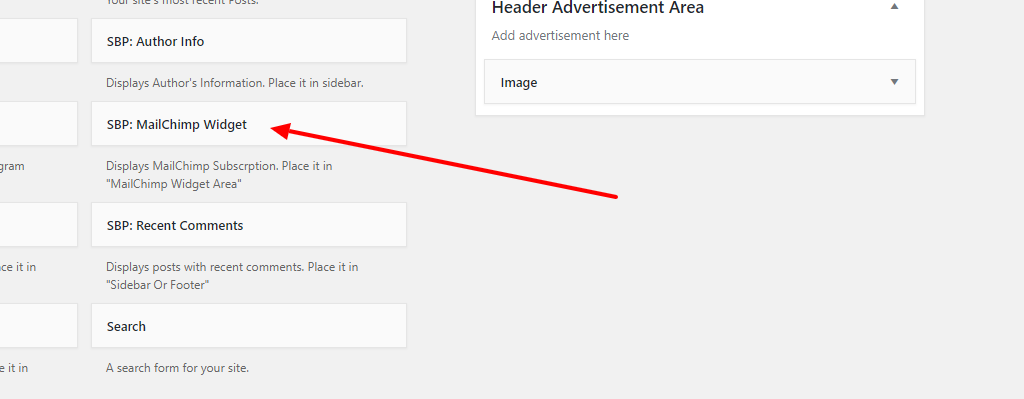
Style Blog plus is compatible with mailchimp. You can install mailchimp plugin & create form. After form is created you will find short code. Copy that short code and paste that at SBP:MailChimp widget.
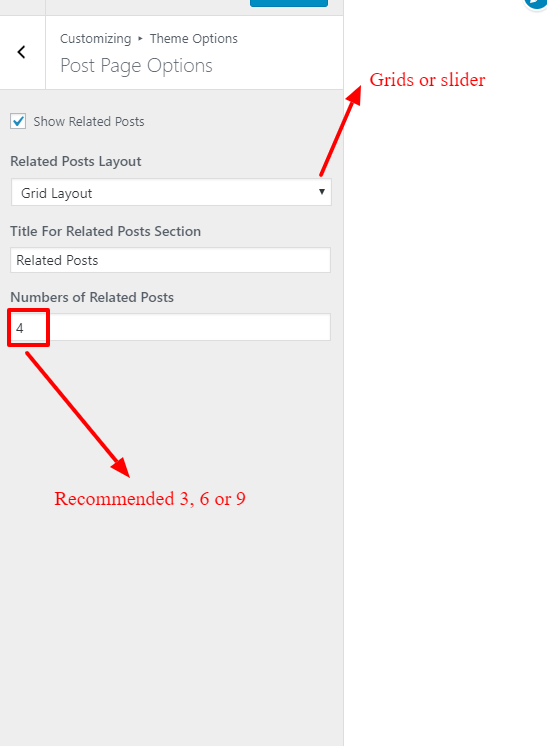
RELATED POST
In free version there is only option of slider to show related post.
In Pro version you can switch related slider to grid layout too.
EXCERPT
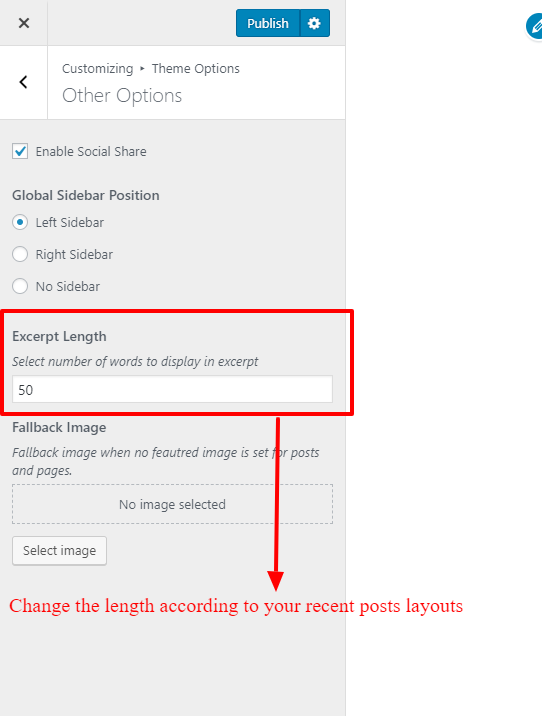
Excerpt plays important role when tweaking layouts. While you choose between recent post layout make sure you change this value according to your requirements.
IMAGES SIZES OF STYLE BLOG
Featured slider : Please use bigger then 750 x 425 px
Featured slider Full width : Please use bigger then 1200 x 550 px
Post Images : Please use bigger then 750 x 425 px
Author featured Image : Please use 160 x 160 px
Important: When you switch different themes ( Activate ) theme your image size may not be suitable for style blog if you are expecting a problem with image sizes make sure you regenerate thumbnails again with a plugin called “Force re-generate thumbnails”.
THEME CUSTOMIZATION OPTIONS & SETTINGS
To customize & tweak theme according to your need there are few options that you can get inside Dashboard > Customizer. In customizer look for theme option.
NEED HAND TO CUSTOMIZE OR ADD OPTIONS IN YOUR THEME ?
We are here to help :). We have a very reasonable cost per hour charge to customize theme according to your need. You can either contact us though email or Look for Live Chat option.
QUESTIONS OR CONFUSIONS ?
If you have any questions or confusions please feel free to ask us in LIVE support or navigate to our support forum and create a thread.